
Name: Harvest
Year of Release: 2024
Player Count: 1 – 4
Playing Time: 30 – 60 Minutes
Designer: Trey Chambers
Publisher: Keymaster Games
Primary Mechanisms: Open Drafting, Variable Player Powers, Worker Placement
Weight (According to BGG.com): 2.65
Overview
I know that “cozy” isn’t a genre, but it sure seems that board games with this description are prevalent across the marketplace. I don’t know if I could explain what makes a game “cozy” but you just know it when you see it. Patchwork and Calico come to mind as essentials in this group. Then there are the nature-themed games that fit into this category: Parks and Cascadia.
The publisher of Parks, Keymaster Games, has returned with another entry in this ever-popular “genre” with Harvest. This farming game plays a lot like a lighter version of Viticulture but outfitted with cute artwork and a grid-based farm board.
Continue reading to find all the details you’ll need, to know if Harvest will become a staple crop at all your future gaming sessions.

Rulebook & Components
I won’t waste your time talking about the rulebook besides saying it is full of vivid pictures, perfectly outlining all areas of the game.
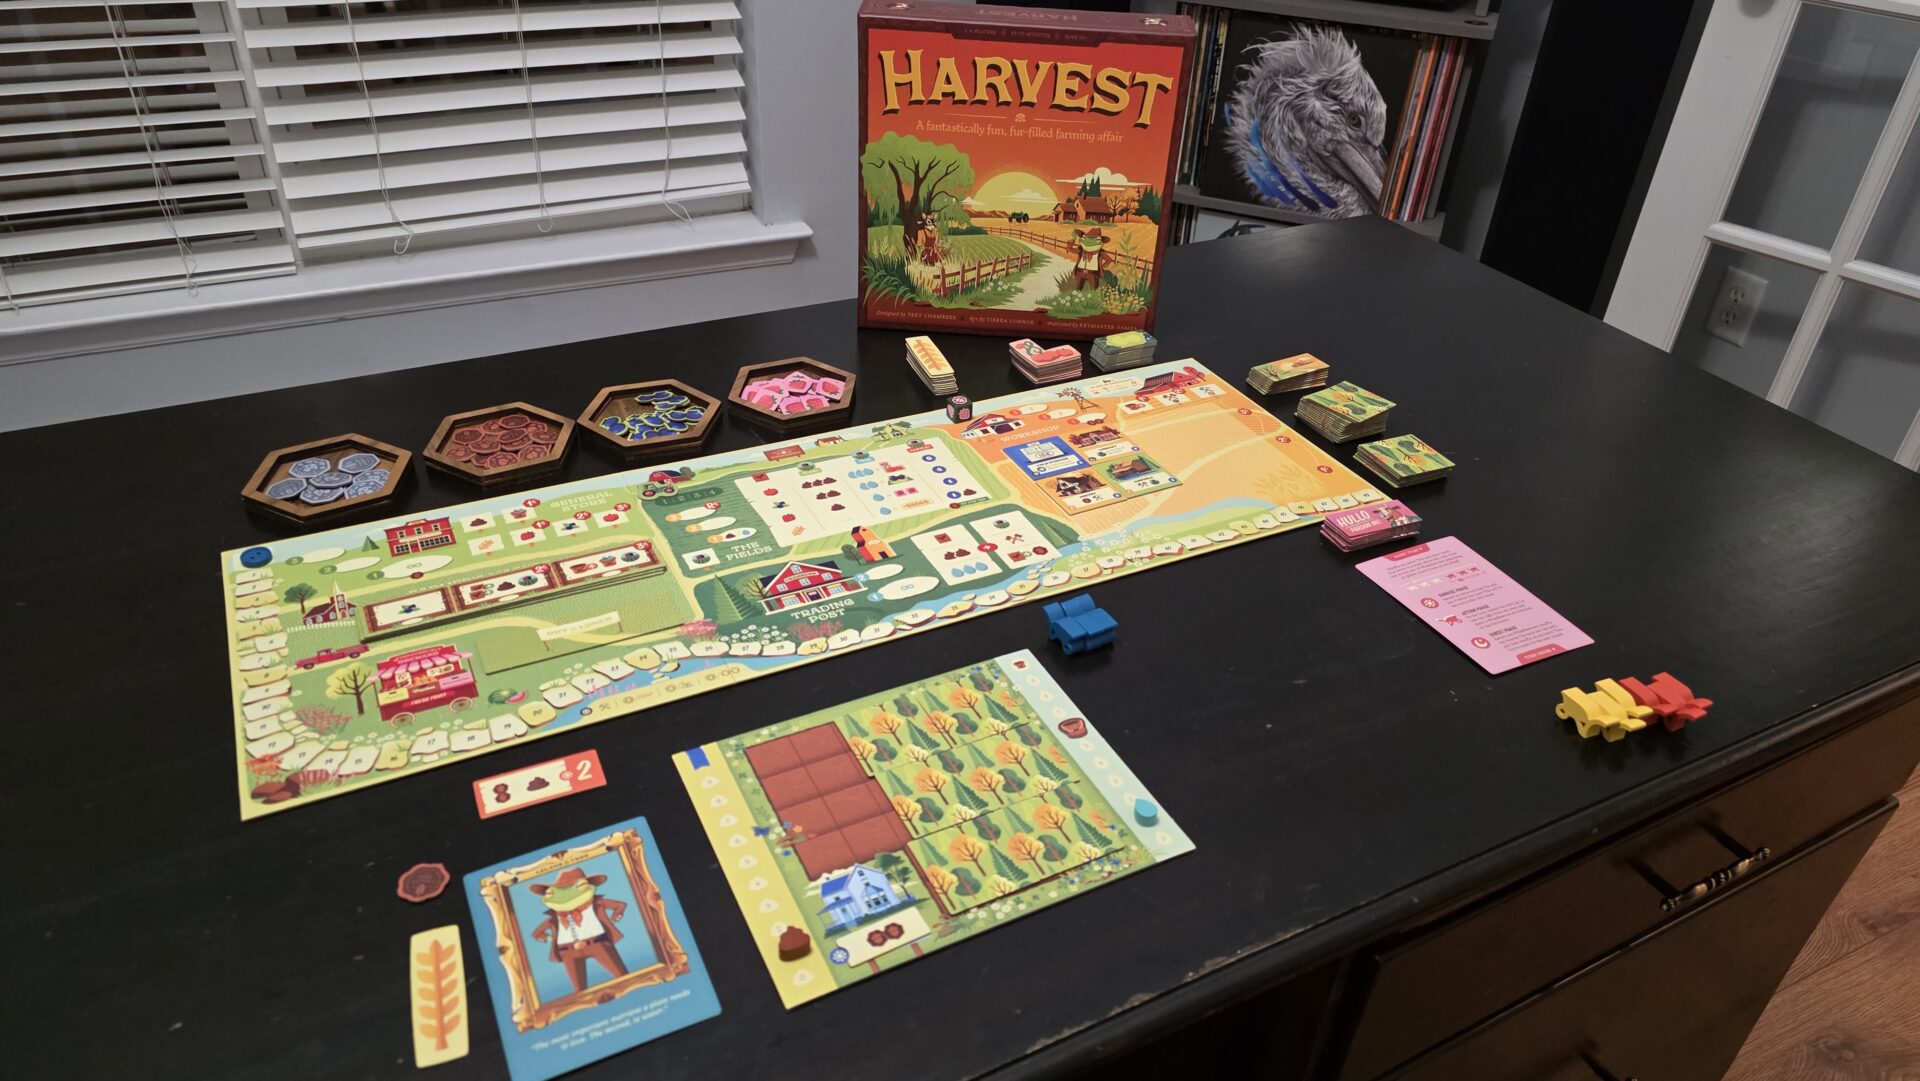
Next up, components. Let’s discuss the boards first, starting with the main Town Board. The board consists of five different sections: The General Store, The Fields, The Workshop, The Farmer’s Market, and The Trading Post. I love that even though these are distinct locations, the artwork allows them to flow naturally, really giving off the vibe of a small town.
Players will each get an individual Farm Board, where they can track the game’s few resources, plant Seed & Crop Tiles, and construct Building Tiles. I do think there was a opportunity to make these two-sided (think the maps in Cartographers), possibly having a different shaped grid for a more challenging farm. My bigger issue with these boards is how easy it is to knock the resources off their tracks, causing some confusion as to where the marker originated from.
The remainder of the components are a mixture of standard cardboard tiles and really great wooden tokens. The Wheelbarrows especially stand out and no “cozy” game is complete without a Button (this time used to track scoring). Why do we all associate buttons with coziness?!
Most of the other components are your standard cardboard chits or tokens. There are some Order Cards that are reminiscent of the wine orders in Viticulture and have a nice artist’s rendition of a different “fancy” cheese on each. While we’re on the topic of artwork, I love the images in this game. The art style evokes late 19th century France, utilizing a duo-tone neutral color palette for the background of the Board Quadrants, with splashes of color enhancing the important play areas. I can’t help but smile when playing the game, taking in all the details across the different components.
While I applaud the components, I have a hard time understanding why the price point is $59.99. I actually passed on this game for quite a while because of how expensive it is relative to similar games on the market. I ended up getting it on sale and while I really like the game, as you’ll read, the jury is still out on if I would recommend this at the $59.99 price.
Ok, time to look at how players are going to put these components to work; planting, tending, and harvesting the fruits (and vegetables and grains) of their labor.
Setup & Gameplay
Note: the bulk of this article will discuss the game as if three or four people are playing. If playing solo or with two players, the setup and gameplay varies slightly. I will touch on that in it’s own section at the conclusion of this article.
As more and more games become bloated with components, boards, and all sorts of add-ons, I become increasingly appreciative of games, like Harvest, with quicker setup times. For the Town Board’s part there are really only two things players need to do. One is to choose three of the available Farmer Market Tiles and stack them with either side face-up in the Farmer Market section of the board. I really love this aspect of the game as it ensures different Farmer Market action spaces every round, lending to the feeling of a real farmer’s market, where you would come into contact with a variety of stalls and tables every week.
The second thing is to place out four Building Tiles, at random, in The Workshop. These should be placed into the left-most columns, with two going into the top row and two going into the middle row. Outside of this, each player should put their Button Score Token on space zero of the score track (running around the outside of the Town Board) and then place the Tractor Round Token above the round one space.
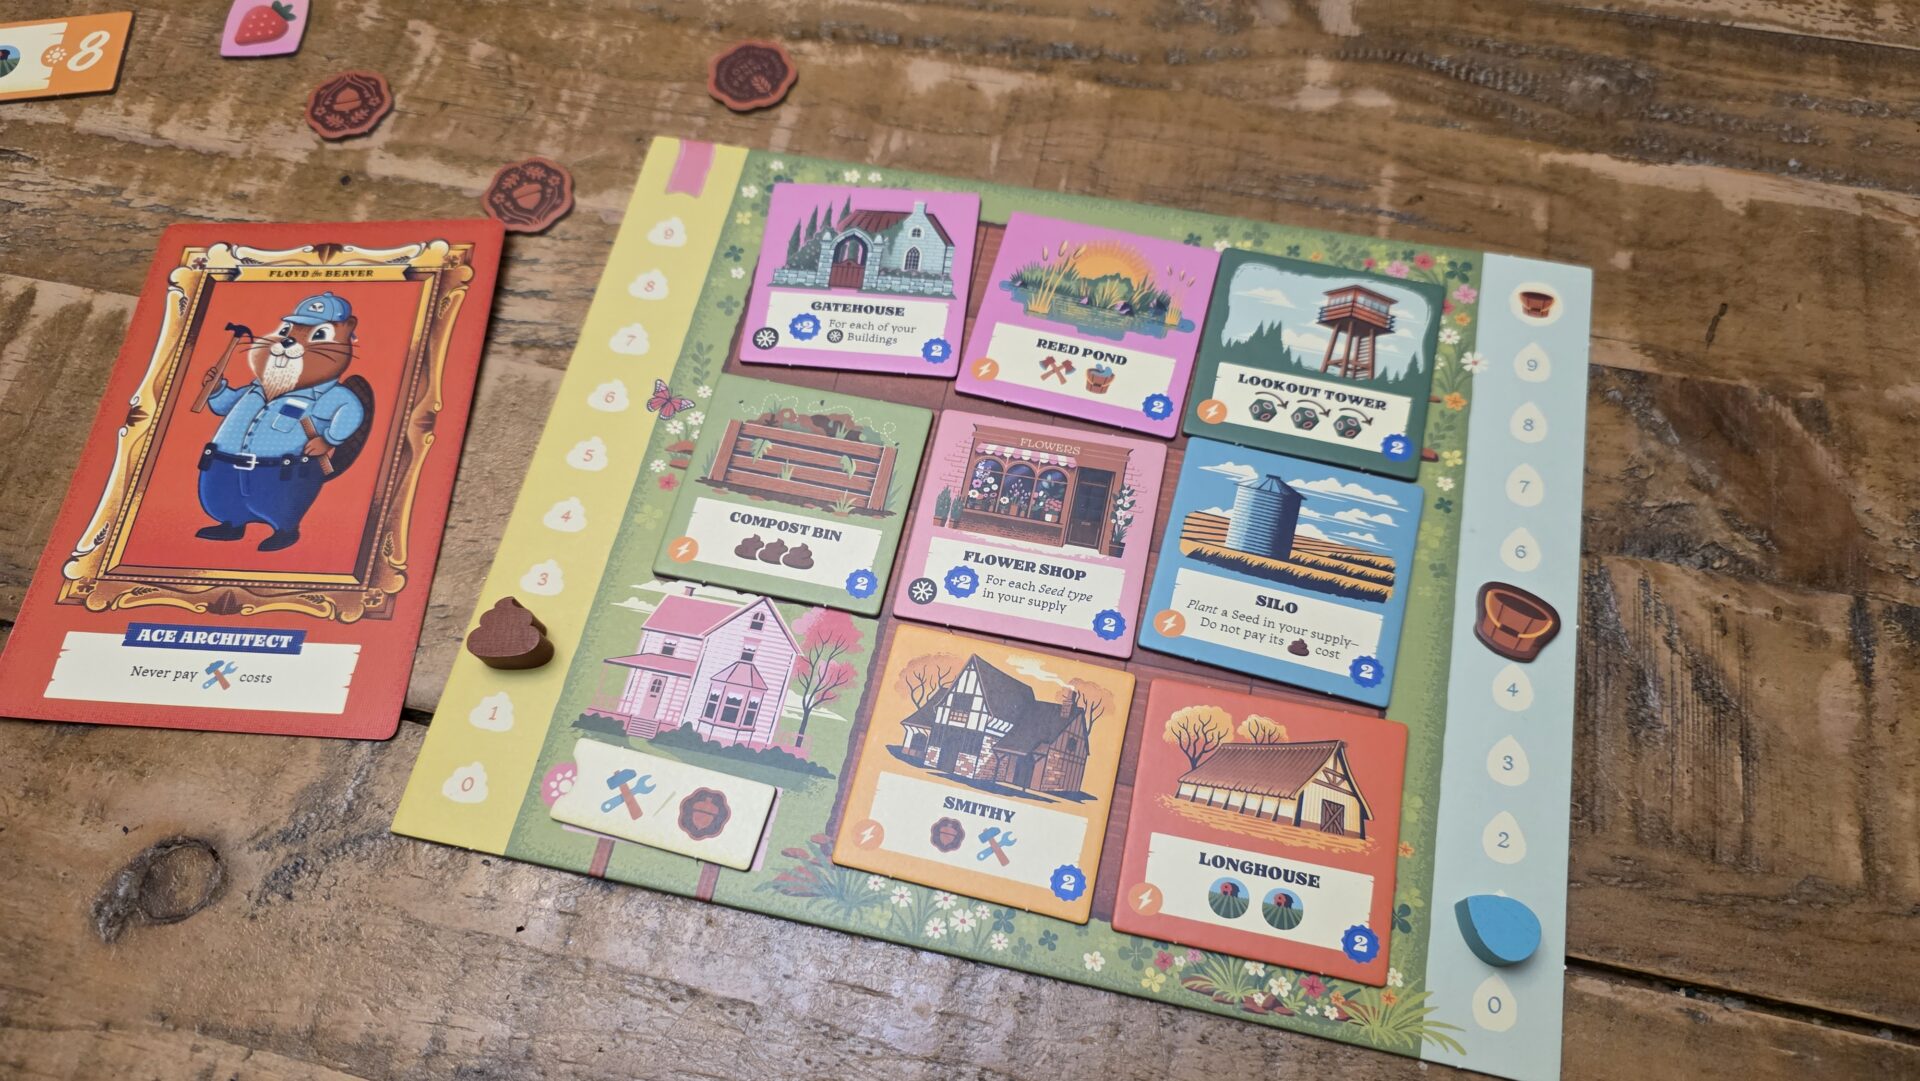
Next, players will need to configure their individual Farm Board. Before this happens, players should figure out which character they are going to play as. In my house we typically deal two Character Cards to each player and let them select which they want to be. Then players need to set their Fertilizer Token to one, their Water Bucket to three, and their Water Token to one. Please note that your chosen character may influence these values so set them to match what your character requires.
Players then need to randomly draw six Building Tiles and keeping them face-down, fill up the two right-most columns on their Farm Board. The players can then be dealt a random Sunrise Tile and then need to choose a Farmhouse Tile. Again, you can deal out two to each player and let them choose or you can lay out both these tiles and the Character Cards and players can draft them, depending on their familiarity with the game. Once players make sure they’ve gotten their three Wheelbarrows, the game can begin
Each of the four rounds in Harvest is played over three phases. The first phase is the Sunrise Phase, where players will participate in an open draft to decide the turn order for that round. Three Sunrise Tiles are flipped for all players to see. These tiles are comprised of a value (one through ten), an icon representing a bonus, and one to four coins. The player with the lowest number on their Sunrise Tile, given out during setup, chooses one of the three tiles and then swaps it with their current tile. This continues for each player, going from lowest to highest around the table. For the most part, the lower number tiles give out less money and fewer bonuses so players have to decide if it is more valuable to take an earlier turn or to get more stuff.
Once this is complete, starting with the player with the lowest number, each player activates both their Sunrise Tile and their Farmhouse Tile. Players can do this in any order but have to completely finish one tile before moving to the next.
Phase two, the Action Phase, begins next. Any gamer with experience with worker placement games should find the majority of this phase familiar, though there are some nice twists within the action spaces themselves. Players will take turns placing one Wheelbarrow on a space and activating the action listed there. A few of the areas will have spaces that are labeled one, two, or three. These spaces can only hold one Wheelbarrow but allows the owner of it to activate the space as many times as the number printed there. As you can guess, the spaces printed with the value three will be in high demand!
Before we talk about phase three, let’s look at each area of the board and what you can accomplish by visiting it.
The General Store
This will be a player’s go-to area when they need to stock up on the resources that make your farm run. Some of the resources, such as Fertilizer are free but other more valuable goods, such as Pumpkins, can cost up to three coins. This space also allows you to refill your Water Bucket. During setup, I stated your Water Bucket starts at three while your Water Token starts at one. In Harvest, you can never have a water value equal to or higher than your bucket’s current level. The nice thing is you can visit The General Store, pay a single coin, and fill your water all the way back up to your bucket’s maximum value.
The Fields
For those players who have always dreamed of tilling the land, watching crops grow from humble seeds to life-sustaining provisions, The Fields is where they’ll spend most of their time. This space is actually a combination of three types of actions. As mentioned earlier, you can take as many actions as what matches the number on the space where you place your Wheelbarrow.
If players already have crops, either Wheat, Strawberries, Blueberry Bushes, or Pumpkins, they can expend the necessary Fertilizer to Plant the crops. Planting involves placing your crops into the empty grid spaces of your Farm Board. Placement is important as you’ll want space to multiple your crops and you can’t move them once you plant them, except to sell them but we will get to that shortly.
The second action available in The Fields, is to Tend your planted crops. Unlike Planting, you’ll need Water and not Fertilizer to activate this action. Tending allows players to multiply their crops, taking free tiles from the supply and adding them to their farm. The catch here is that you have to have the free space on your grid to fit these in and they must be placed adjacent to a crop of the same type.
The last action at The Fields is to Harvest your crops. Harvesting allows you to clear your Farm Board, earn Victory Points depending on the crops sold, and earn a little cash for selling them. Trying to decide when to continue to grow your inventory and when to pull the trigger on selling is always an important decision. Making the right choices in The Fields can net a player a huge bump in their score and really turn the tide of a game.
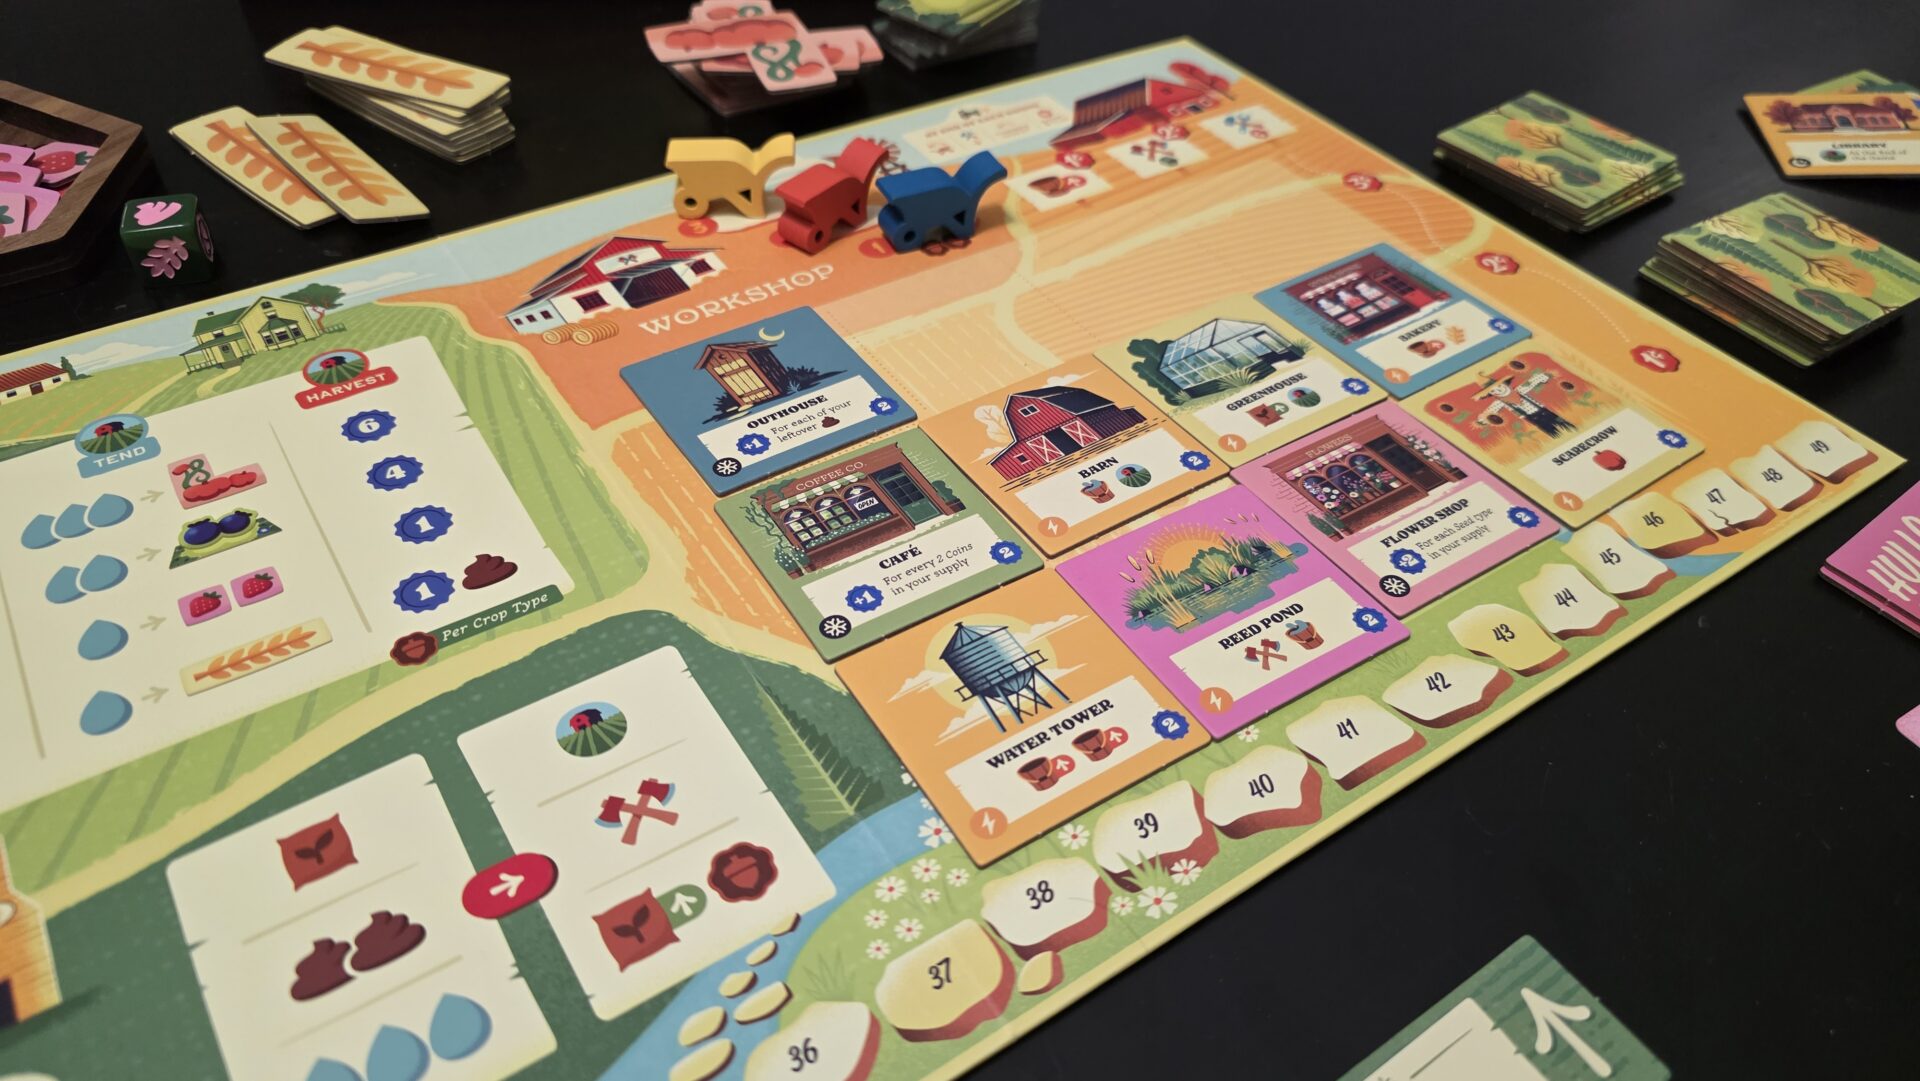
The Workshop
Crops aren’t the only thing you’ll be adding to your farm, as players can visit The Workshop to pick up buildings to construct on their land. Odds are you’ll need to clear some land to have the required space though and The Workshop can help you with this endeavor as well.
When taking the Clear Land action, players can choose any single forest tile off of their board. They will then flip it over and put it in the left-most space of the highest available row in The Workshop. Lastly, they will roll the dice and be awarded depending on what they roll.
Once a player has the space on their farm, they might want to use The Workshop to start constructing buildings on their land. Players will choose one of the available Building Tiles from the market and pay the associated cost: three coins for any tile in the top row, two coins for the middle row, and one coin for the bottom row. Buildings come in three different styles: those that give immediate benefits, those that give an extra action at the end of the game, and those that give end-game scoring bonuses for meeting criteria. Most buildings also provide a minimum of two Victory Points for just putting them in your farm.
The last action at The Workshop is the ability to increase your Water Bucket by one. Yeah, it seems pretty lame compared to all the other actions available, but it has its place and you’ll never Tend to more than a few crops at once if you don’t work on increasing this.
The Farmer’s Market
The spaces at the Farmer’s Market can be thought of as an amalgamation of all the other action spaces. Sometimes these spaces allow you to buy resources at a discount, sometimes they let you take an extra action. It’s a veritable treasure trove of Harvest goodies and the tiles will change every round so players will need to make haste to grab the best spot before it leaves the table.
The Trading Post
It might just be me, but most games, we never even use this spot. It allows players to trade in Fertilizer, Water, or a Crop and turn them into an extra The Fields action, upgrading a crop, or clearing a land tile for free. I guess with a lot of players, the action spaces can get filled up quickly and a player is forced to use The Trading Post because they lack a viable option elsewhere? Maybe it’s helpful for some but this spot is pretty forgetful for me.
After all the Wheelbarrows have been placed, phase three, Cleanup, can commence. The round marker is moved right one space, the Farmer’s Market Tiles that were just used are removed from the board, all Building Tiles are adjusted down one row and the outgoing bottom row tiles are removed from the game, and then three new Sunrise Tiles are flipped over. Phase one of round two now starts and the game ends after four rounds.
General Thoughts
You’ve read about the components, the setup, and how to play, but does it all come together in a fun experience? The short answer is, “yes, but with some caveats.” The biggest detractor is simply that Harvest doesn’t do enough things different to find a place in a seasoned player’s collection. However, for a gamer who is just getting into the hobby, I would highly recommend it, but then there is the steep price point for the amount of game here.
But both those negatives are more about how the game might fit into your collection and not the game itself. The gameplay itself is wonderfully crafted, giving players enough depth to feel rewarding but light enough to get in multiple plays in a single sitting. Additionally, the variable player powers, the Farmhouse Tiles, and the Farmer’s Market Tiles give each game a sense of variety, allowing players to slightly adjust their strategy for each game.
Solo Mode Thoughts
I originally thought that Harvest would be a big hit in my house and that I probably wouldn’t touch the solo game very often. Wow, how wrong was I? I have probably played solo 3:1 compared to multiplayer.
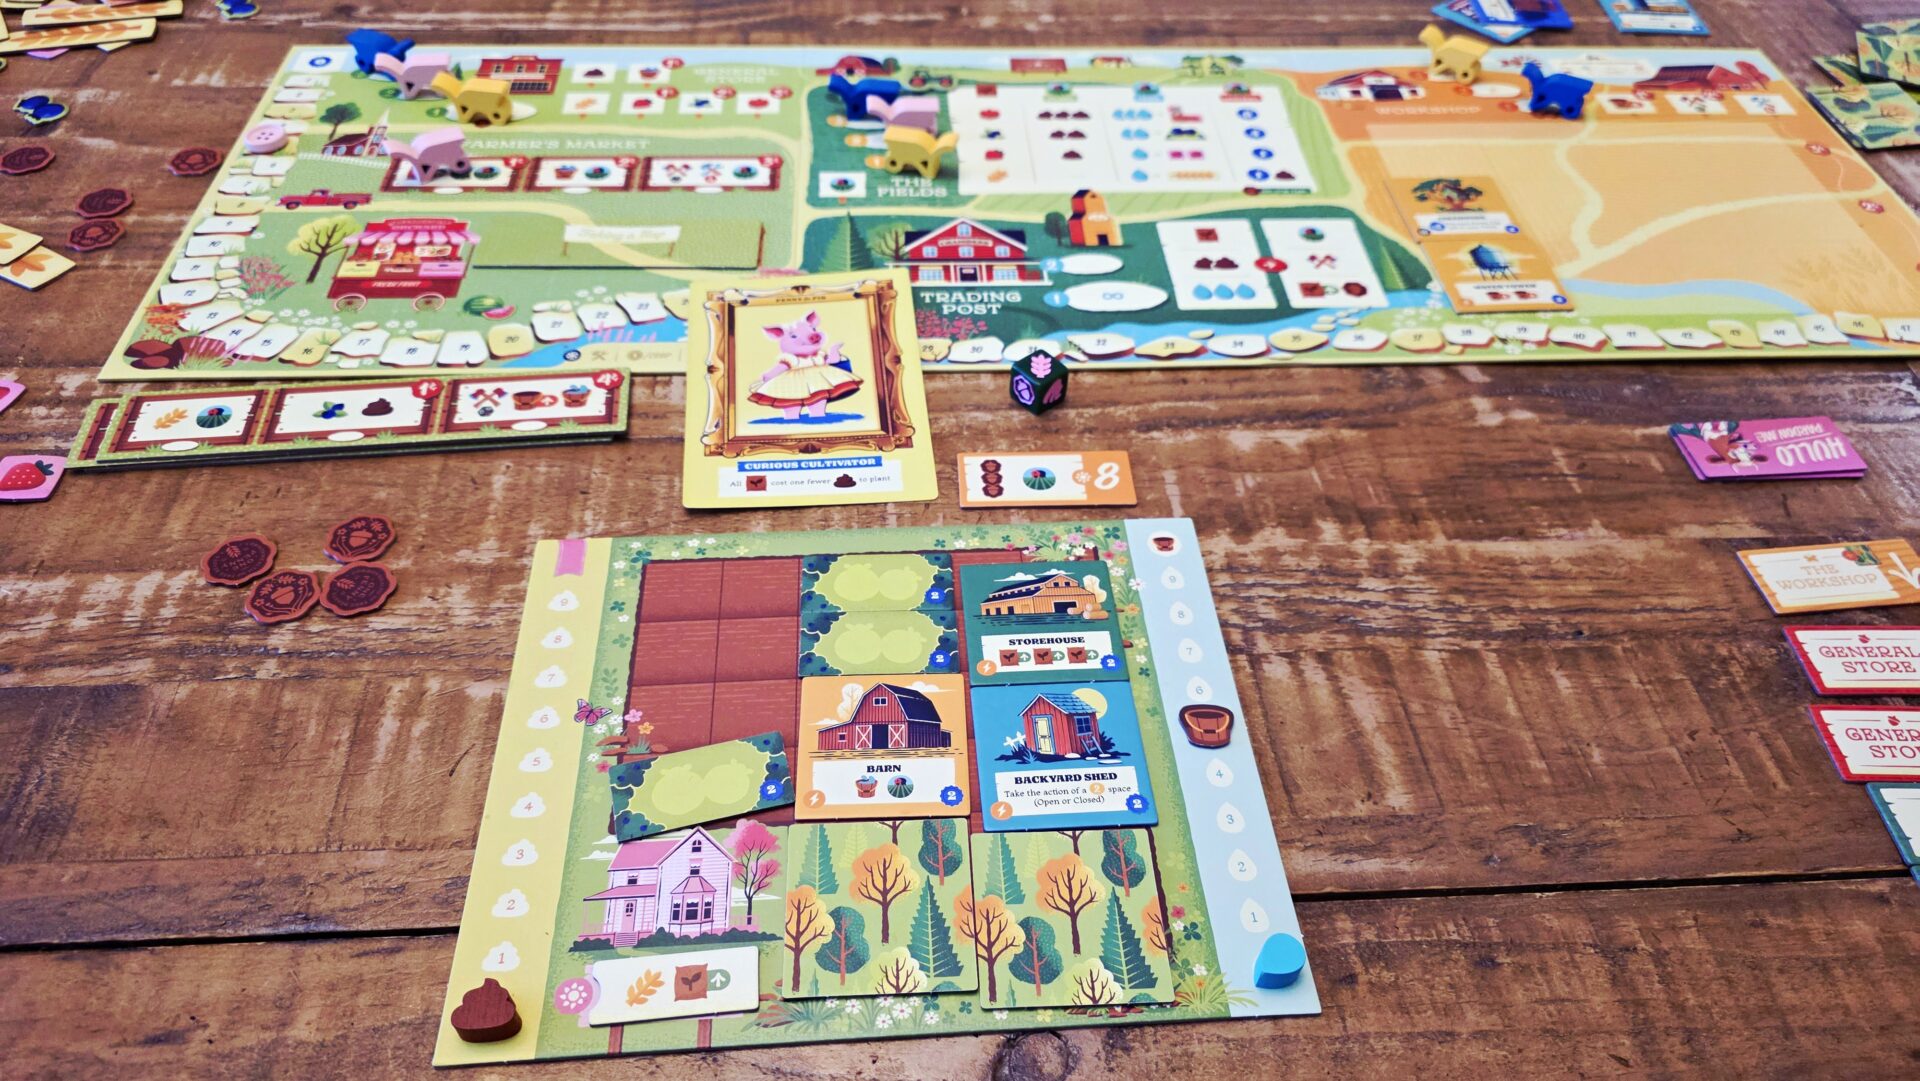
In single player, you have to contend with Mayor Gary, a character who uses his Wheelbarrows to block action spaces. Gary itself is simply controlled by a stack of tiles so don’t think you’re getting a complicated Automa to play against. But the single player shines because of the 17 Challenges printed in the extra book that comes with Harvest. These challenges outline what character to play as, a minimum amount of Victory Points to earn and usually some other criteria. I have loved my time with these challenges, especially when I get stumped. I was stuck on the challenge where I had to use Penny the Pig, sell all four crops in one turn, and score 55+ points. When I finally beat it, I was ecstatic and that’s what I love in a solo board game.
Conclusion
I hope that readers don’t think that I don’t enjoy Harvest, as that is not the case at all. It is a game that I enjoy playing every time I get it to the table. But with so many games out there, and limited funds for the majority of us, I want to make sure readers have a realistic view of where this fits, or doesn’t fit, in a collection.
Rating
Ratings are based on 5 main criteria: rulebook, setup, components, art & graphic design, and gameplay. The first 4 criteria are rated 1 to 5 and the gameplay is rated 1 to 10. These scores culminate in an “overall satisfaction” score that is rated from 1 to 10. If the reviewed game has both a solo and multiplayer mode, I have assigned scores separately to give context to which mode we enjoy more.
Rulebook – 4
Setup – 4
Components – 3
Art/Graphic Design – 4
Gameplay (Multiplayer) – 6
Gameplay (Solo) – 7
Overall Satisfaction (Multiplayer)
Overall Satisfaction (Solo)
Pros:
- Great variety from game to game with player powers and Farmer’s Market Tiles
- Perfectly designed for light-to-middle weight
- Easy setup and ruleset
Cons:
- May not do enough different to standout amongst other worker placement games
- High price point for a game this size