
Name: Stonesaga
Year of Release: 2026
Player Count: 1 – 4
Playing Time: 60 – 120 Minutes
Designer: Max Brooke & Luke Eddy
Publisher: Open Owl Studios
Primary Mechanisms: Legacy, Campaign, Solo, Dice Rolling
Weight (According to BGG.com): – 3.47
Introduction
In the interest of transparency, I received a complimentary copy of Stonesaga for review purposes. This did not influence my assessment, and the opinions expressed here are my honest and unbiased reflections on the game.
A second printing has been announced on Kickstarter for Stonesaga. Please click HERE to check it out and own a copy!
Growing up in the late 80’s and 90’s, video games were a huge staple of my childhood and teenage years. I wasn’t very picky and would try just about anything. I remember staying over at friends’ houses during summer, staying up all night playing the latest NHL installment, Worms, or Metal Gear Solid. Eventually my love of console gaming brought me around to computer gaming where I discovered Team Fortress Classic, Half-Life, and Diablo. This all culminated in me getting World of Warcraft at launch and subsequently playing it for the next fifteen years of my life. Honestly, after WoW, I never really got back into video games like I was before. It just seemed that nothing ever sparked the wonder of that game for me.
I bring this up because it kind of amazes me how many board games are coming out that attempt, and largely succeed, at replicating these open-world, sandbox, narrative driven video games. This is the space that Stonesaga, the latest from Open Owl Studios, seems to be filling. Read on to see if it pulled me into its world or just left me looking for more.
This review is going to be centered on playing solo, using two characters. At the time of this writing, I have not played this with other players and will not be commenting on the game from that angle.
I will also do my best to avoid spoilers but there will be discussion and pictures featuring some of the “Advanced Rules” which players might not interact with on their first game.
Rulebook
If you haven’t looked into this game yet, you might not understand quite how huge it really is. When the package arrived at my door, I was thrown for a loop when I picked it up. Did the company accidentally ship me three copies of the game? Actually, no they didn’t, this game just weighs 11 pounds! Why am I talking about this in the Rulebook section, you might be asking? Mostly so that you have an understanding of the sheer number of things going on in the game, meaning there also has to be a gigantic rulebook to explain all these things. And this brings me to my first slight criticism.
Out of the box, the rulebook has multiple printing errors. I don’t know how many there are, but it felt like a lot, especially when there are some featured in the first game setup section. I was left scratching my head about a few things right out of the gate. I am not just talking about things that aren’t really made clear, I’m talking about things that are absolutely wrong. An example would be a list of cards you need to add to the Fishing Deck though the card numbers are completely wrong. It’s hard to fathom mistakes like this slipping through the editing process and being able to be printed in the final product.
On the other hand, the rulebook (and Codex) holds a truly mind-boggling amount of information, so I am sure that this was a great undertaking. On top of that, the company has released both an Errata Document File and an app that includes the rulebook and Codex with corrected entries. I don’t want to discount this commitment to making things right for the player, but it’s a shame that the first piece of the game that players are going to interact with might end up leaving a bad taste in their mouth.
Setup
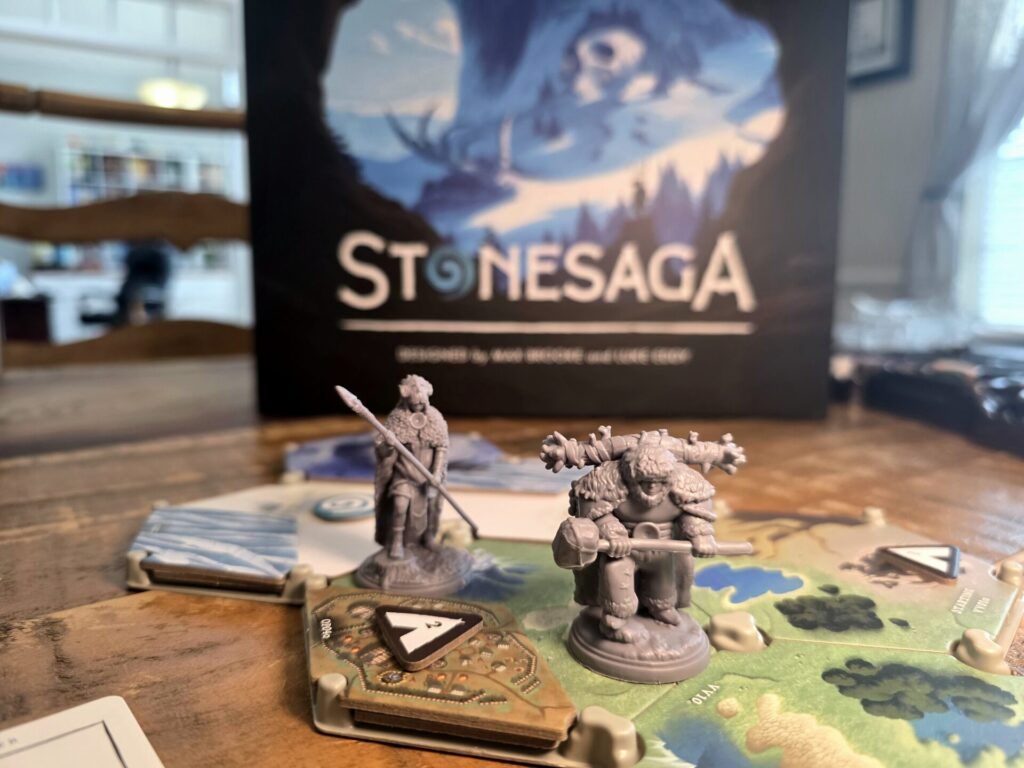
The setup (and subsequent tear down) of Stonesaga could have ended up being a train-wreck with the number of tokens, cards and tiles involved. One of these games where you spend more time doing those two activities than actually playing. In reality, it handles this piece brilliantly, especially if you are able to play a few back-to-back games in one sitting. The designers included two awesome Society Trays; not only holding a spectacular number of tokens but also keeping track of where your civilization stands on the four Society Tracks between games. The game also includes a Discovery Tray that holds all of the Terrain Hexes and Hex Overlays. There are plenty of spaces to arrange these tiles as you see fit so that you can pack and unpack the “board” (called The Valley from here on out) in a timely manner. Lastly, the two Card Boxes come with Card Separators that make packing the cards up an easy task. The designers also included separators labeled for the players Stash, meaning you can throw the tiles and items that are going to move from game to game in the Card Box and not have to worry about them mixing up for the next game.
If I had any gripe about the setup, it would be the use of the Journal in this process. The Journal is where you keep information about your future games, as well as mark the hexes on a blank map so that you can set up The Valley in the same configuration. Most of the Journal just doesn’t have the necessary space and it would have been nice to have multiple pages for things like the map so you could use it for multiple campaigns. As it stands right now, if I played another campaign, I think I would have to just make notes on blank pieces of paper which isn’t going to be nearly as “thematic” as the Journal.
Gameplay
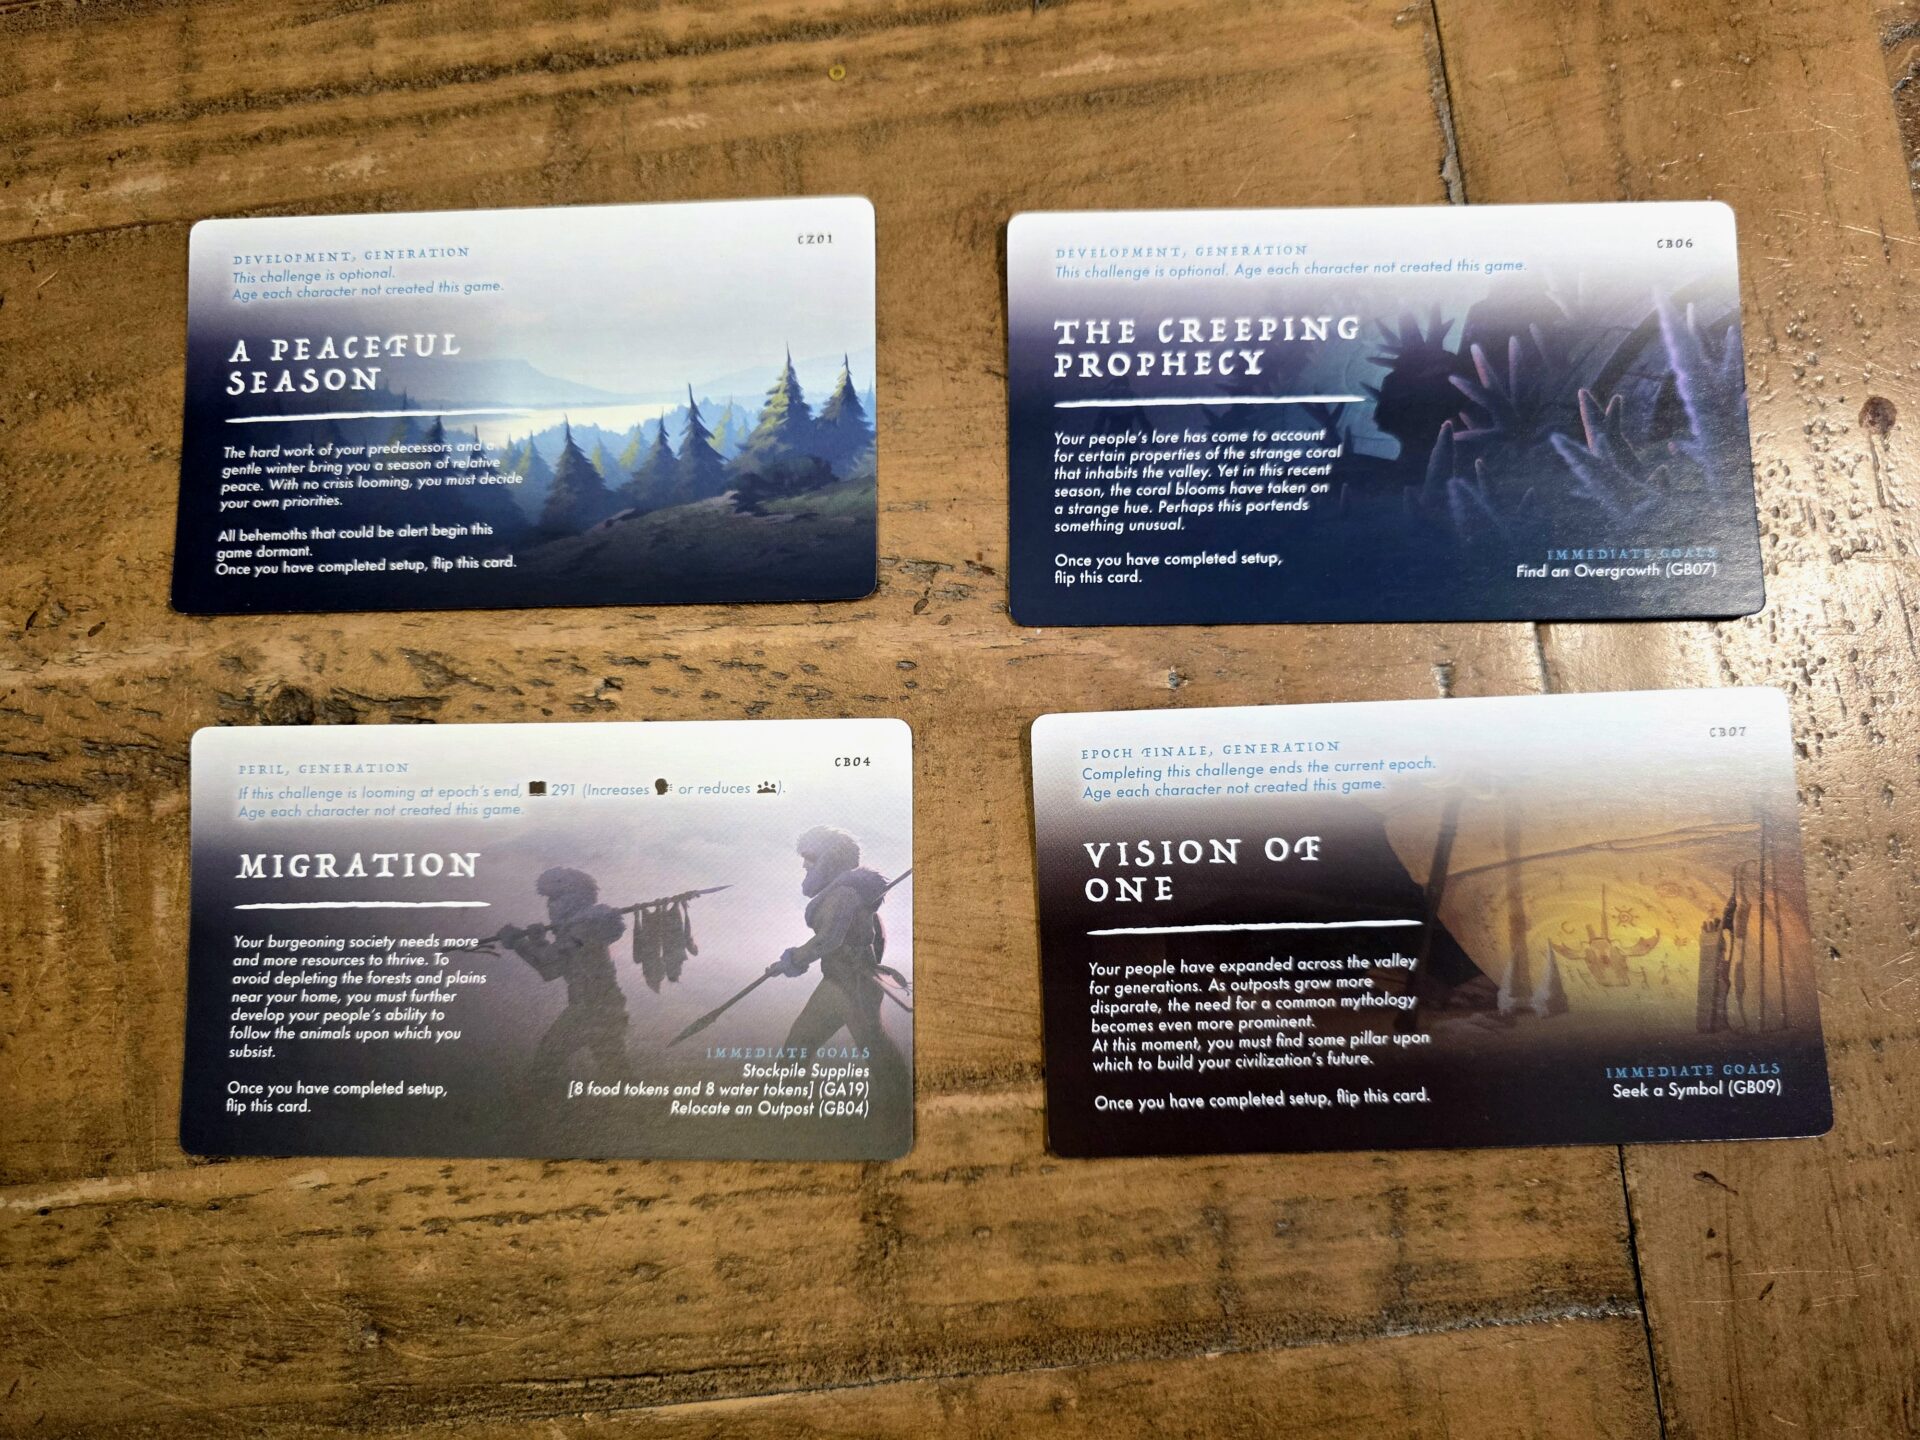
Stonesaga is a campaign game played over three Epochs. Each Epoch can be made up of a varied number of games, or Challenges. Within these Challenges, players will attempt to triumph over both Immediate Goals and Ongoing Goals to keep their civilization progressing. The Challenge system is a great way for the game to have that “sandbox” feel. When a game starts, players will choose one Challenge to work on. Some of these challenges are marked with certain timing regulations, such as a specific Challenge to play if it is the beginning of an Epoch. Others are marked as Optional and can be done when the player is ready, or they can skip them altogether though some might force your civilization’s Population to decrease or the Unrest value to increase. Lastly, there are Epoch Finale Challenges that will mark the end of an Epoch. I have enjoyed how this system works, as you can discover more Challenges as you play, and mark them down in the Journal as a Looming Challenge. Then when you start the next game, you can choose which Challenge you want to work on. Maybe you want to get a few Ongoing Goals completed so you choose an Optional Challenge, or maybe you’re ready to get to Epoch 2 so you choose the Epoch Finale Challenge as soon as you can. It is truly up to the player to choose the route they take.
The aforementioned Goals work in a similar manner. Most Challenges direct players to grab an Immediate Goal or two out of the box. These will instruct the player on what they need to be trying to accomplish in this specific game. There might also be Ongoing Goals listed that don’t have to be immediately completed and can move from one game to the other, though beware that these won’t move from one Epoch to the next so there is a time element to it.
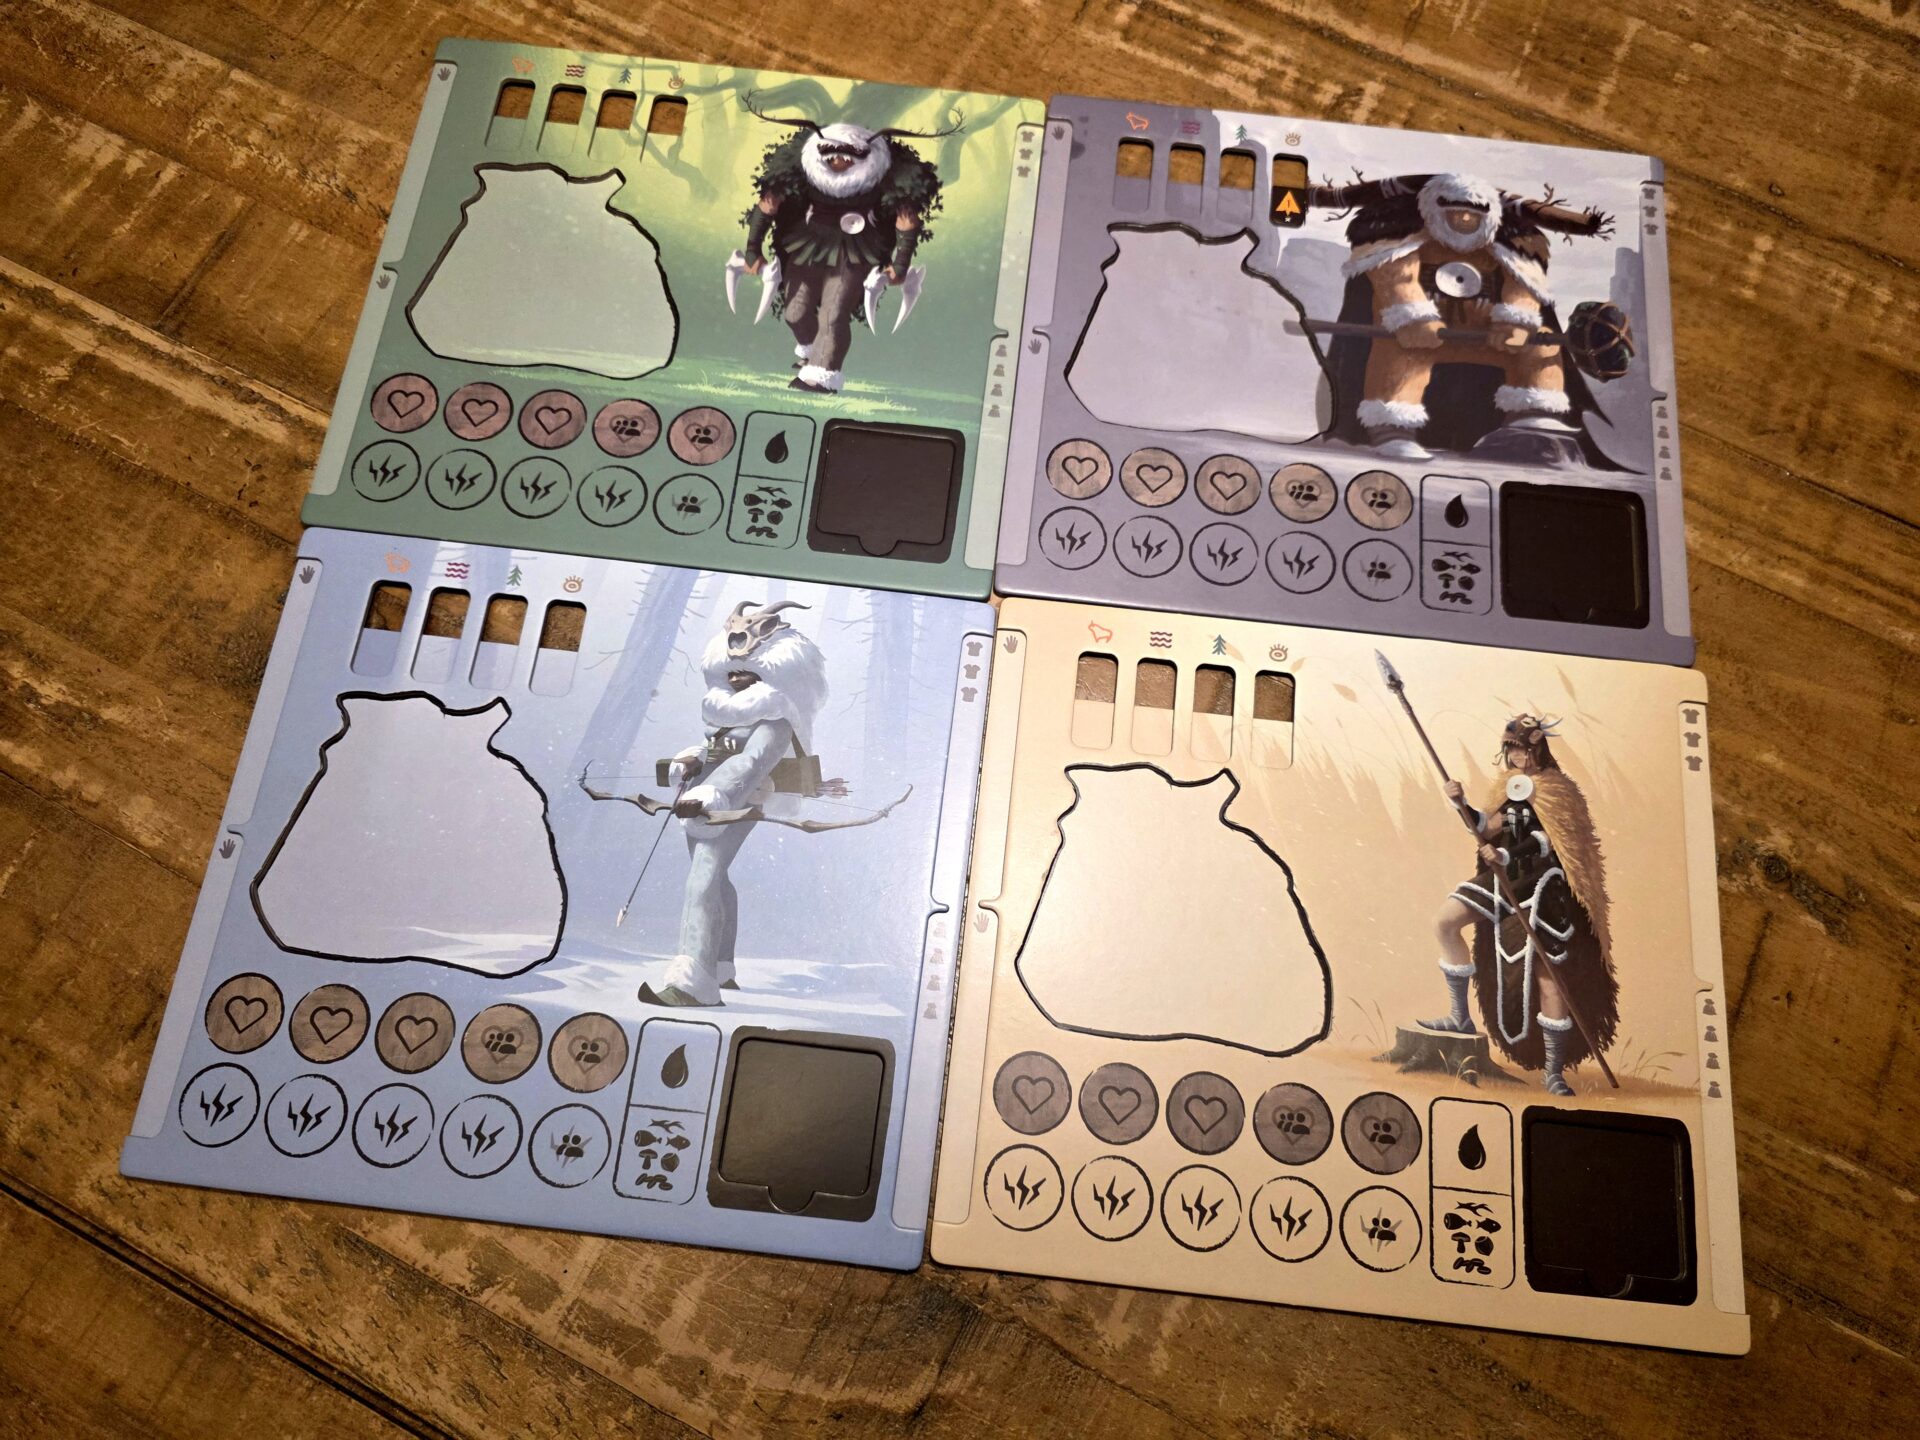
At the onset of the campaign, players will be creating Characters that they’ll use to accomplish said Goals and Challenges. Stonesaga is much more concerned with the story of your overall civilization progressing than your individual Character. Characters age between games and will typically last only two games before becoming a Legend. They can also perish during a game if afflicted by enough Maladies but honestly, I’ve not even had this happen yet, but it is possible. But don’t worry, your dead Character can bequeath a limited number of Materials and Items to your next Character so you’re not losing progress every time he or she dies off. Likewise for the Outposts and Structures you build; they won’t all make it from one Epoch to the next, but the game has a way to reward you with new Structures (at no cost) between Epochs depending on what you’ve accomplished. I’m a big fan of how this works in-game, as I felt like time was truly impacting my civilization but also never felt as if the game was punishing me and making me start over at the start of each Epoch.
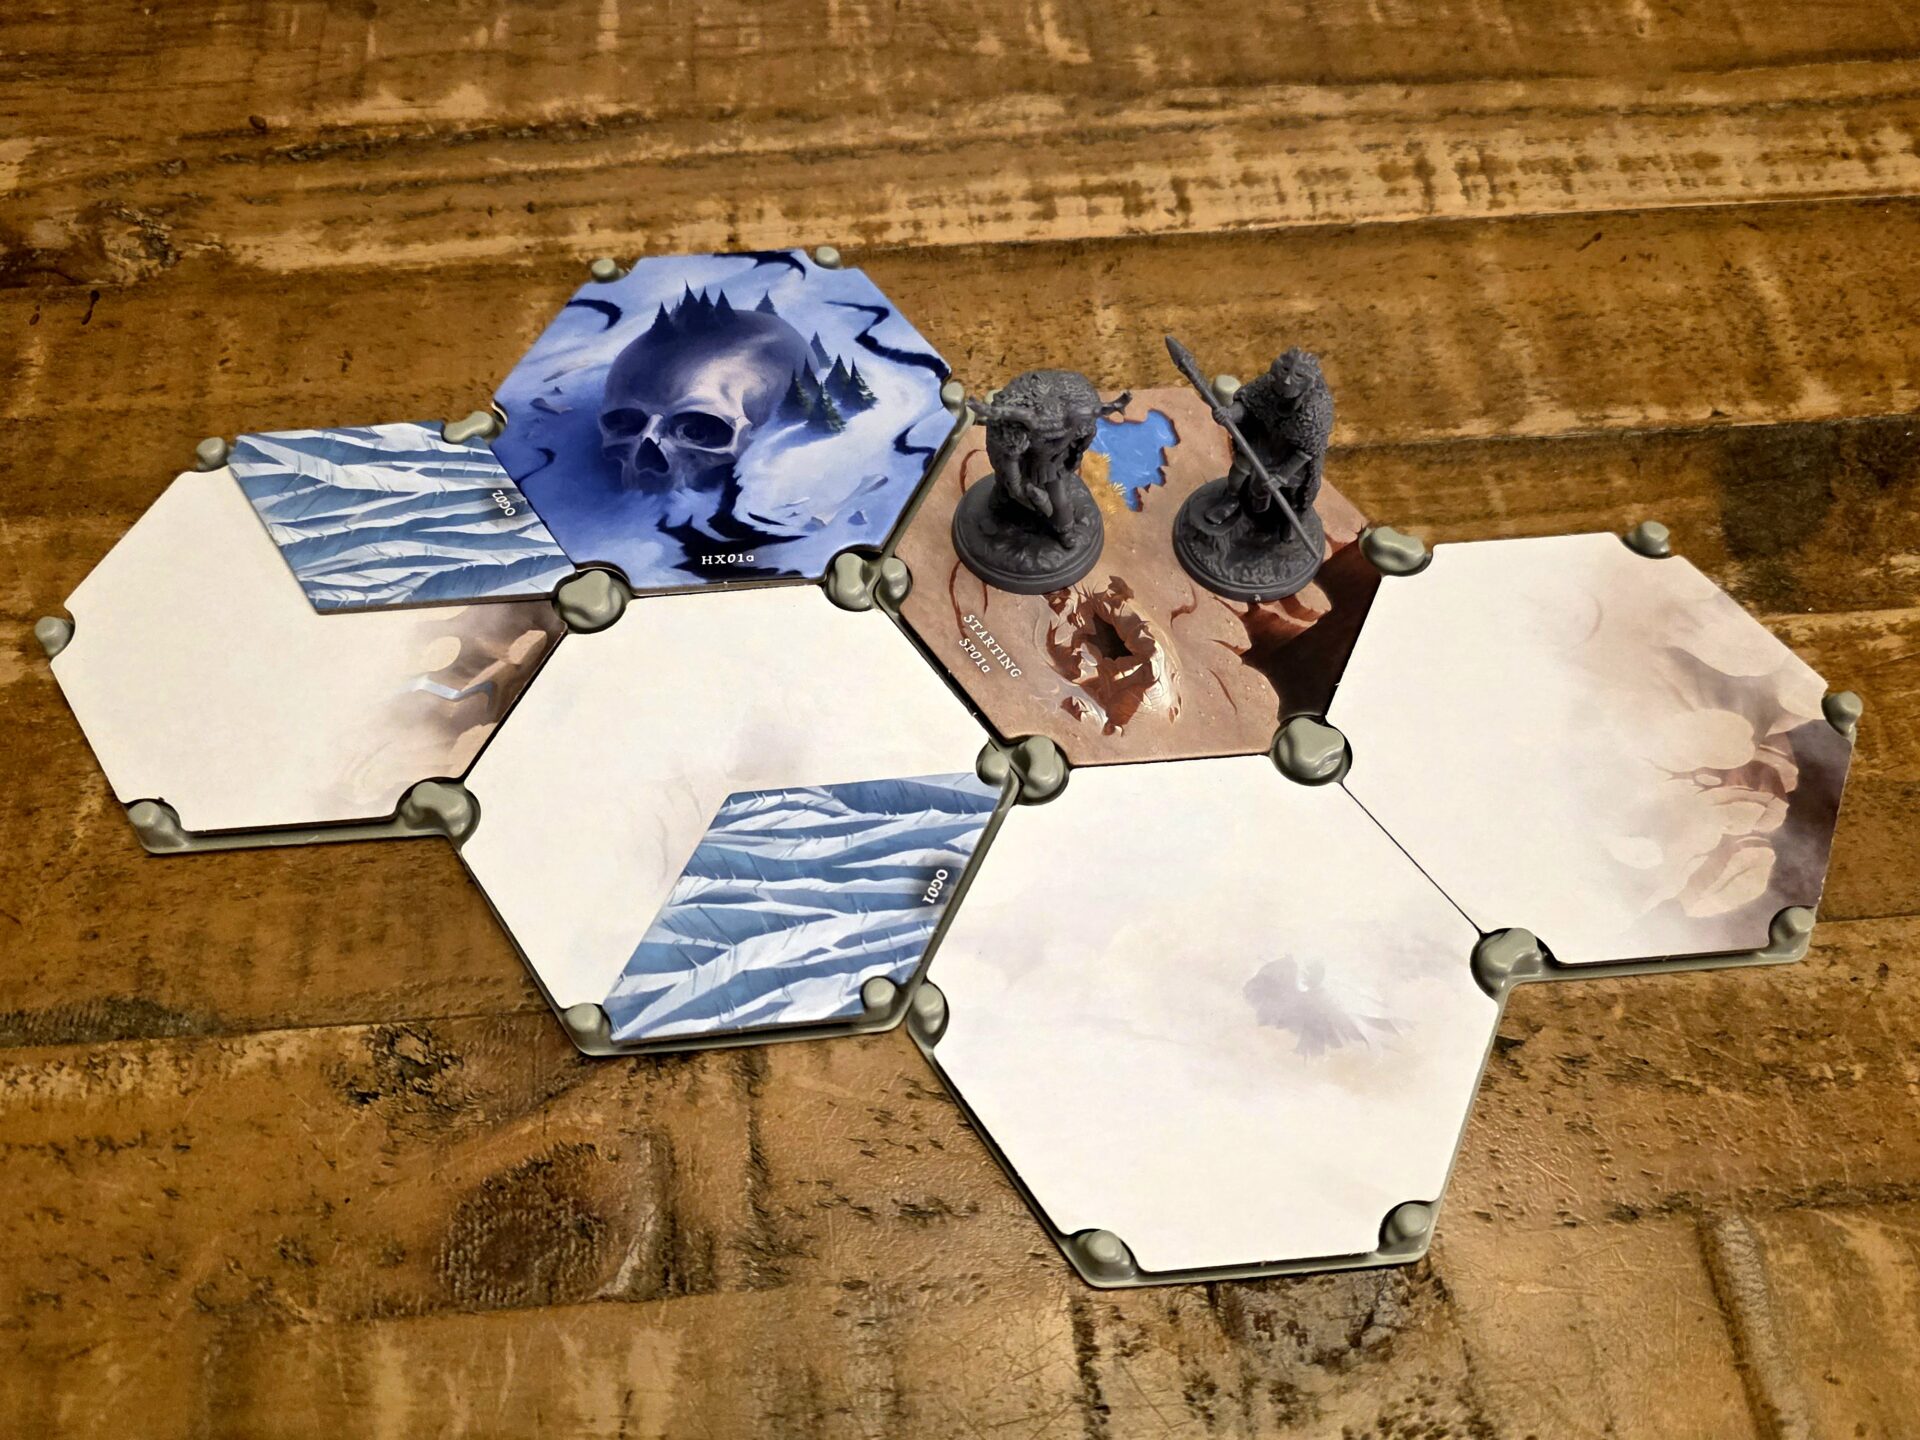
To succeed at the Challenges and Goals, the players will be moving around the Hex Map, uncovering new hexes, while spending a limited pool of Energy to take part in certain tasks. The amount of Energy, and Maladies a player is allowed, is dependent on the number of players. As I mentioned in the intro, I played through my campaigns as a solo player but was in control of two Characters at simultaneously. Each Character takes “turns” though one Character can take multiple turns in a row before moving to the other. The game is set up this way to ensure that certain things (like Exchanging Food) can’t be done in the middle of a player’s turn. The round doesn’t even necessarily have to end when players are out of Energy, as Moving from hex to hex doesn’t require the spending of Energy. At some point though, players will be out of things to do and will need to move from the Day Phase to the Night Phase.
In the Night Phase, players will regain a default amount of Energy, plus more if they are able to Hydrate with Water Tokens or Feed on one of the multitude of Food Tokens. The Night Phase can also trigger certain Boosts to player attributes if they have certain Items in their inventory. The night also brings trouble though. Each player must draw and resolve a Night Card, typically bringing with it an injury, loss of Energy, or some other negative aspect if not successful.
The resolution of these Night Cards, as well as multiple other game mechanics we’ll discuss below, depends on your Character Attributes and the roll of a few dice. Yes, you read that right… dice. (Did I lose any readers now that they know dice are involved?) Please don’t think Stonesaga is going to pull a Final Girl though, as many times the players will have plenty of ways to mitigate poor dice rolls. When a Character is created, the player will roll five dice (out of six) until they sum to at least 14. At this point, the player will trash the lowest value and be left with four values that they need to assign to the four Character Attributes: Might, Dexterity, Conviction, and Awareness. Whenever the game asks you to Test an attribute, the player will roll a die and add its value to the Character Attribute being tested. Many Item Cards, Traits, Marks, and other discoveries throughout the game will allow players to add to the tested value. Players will then compare their final value to the outcomes printed on the card, and/or Codex, and then resolve the stated action. Playing through one full campaign (plus a single Epoch to get used to the game), I can really only think of two or three times when I was forced to roll a six to pass the test. Failing the tests isn’t even that bad, as you can almost always try again, you might just have to wait longer to regain the needed Energy or Resources.
We’ll take a look at some of the more important Basic Actions first, as players will learn these during their first game so there aren’t any spoilers involved here.
Basic Actions
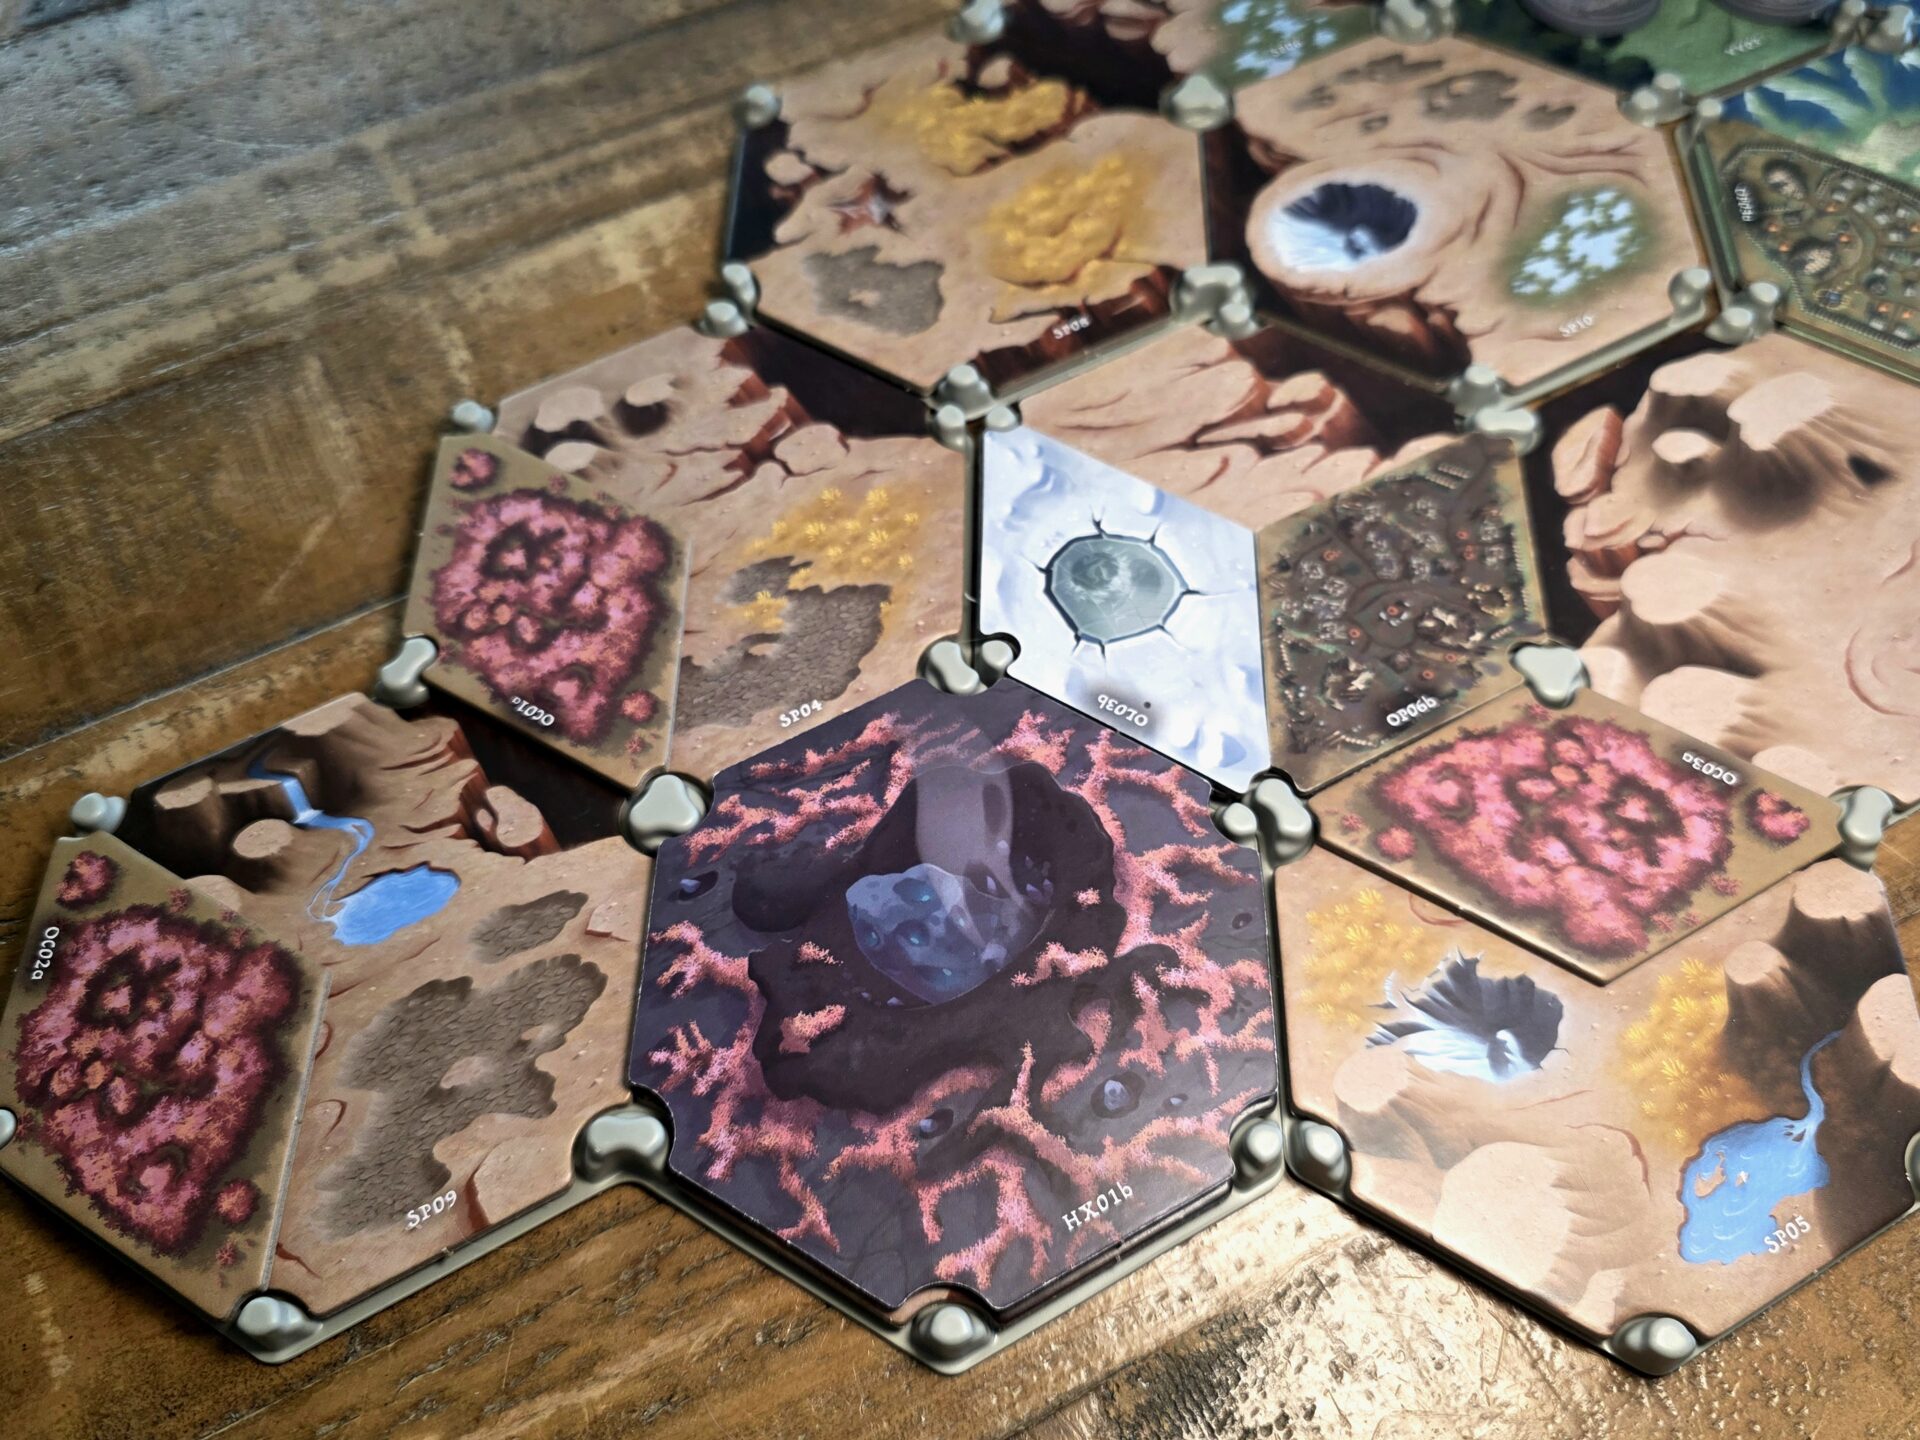
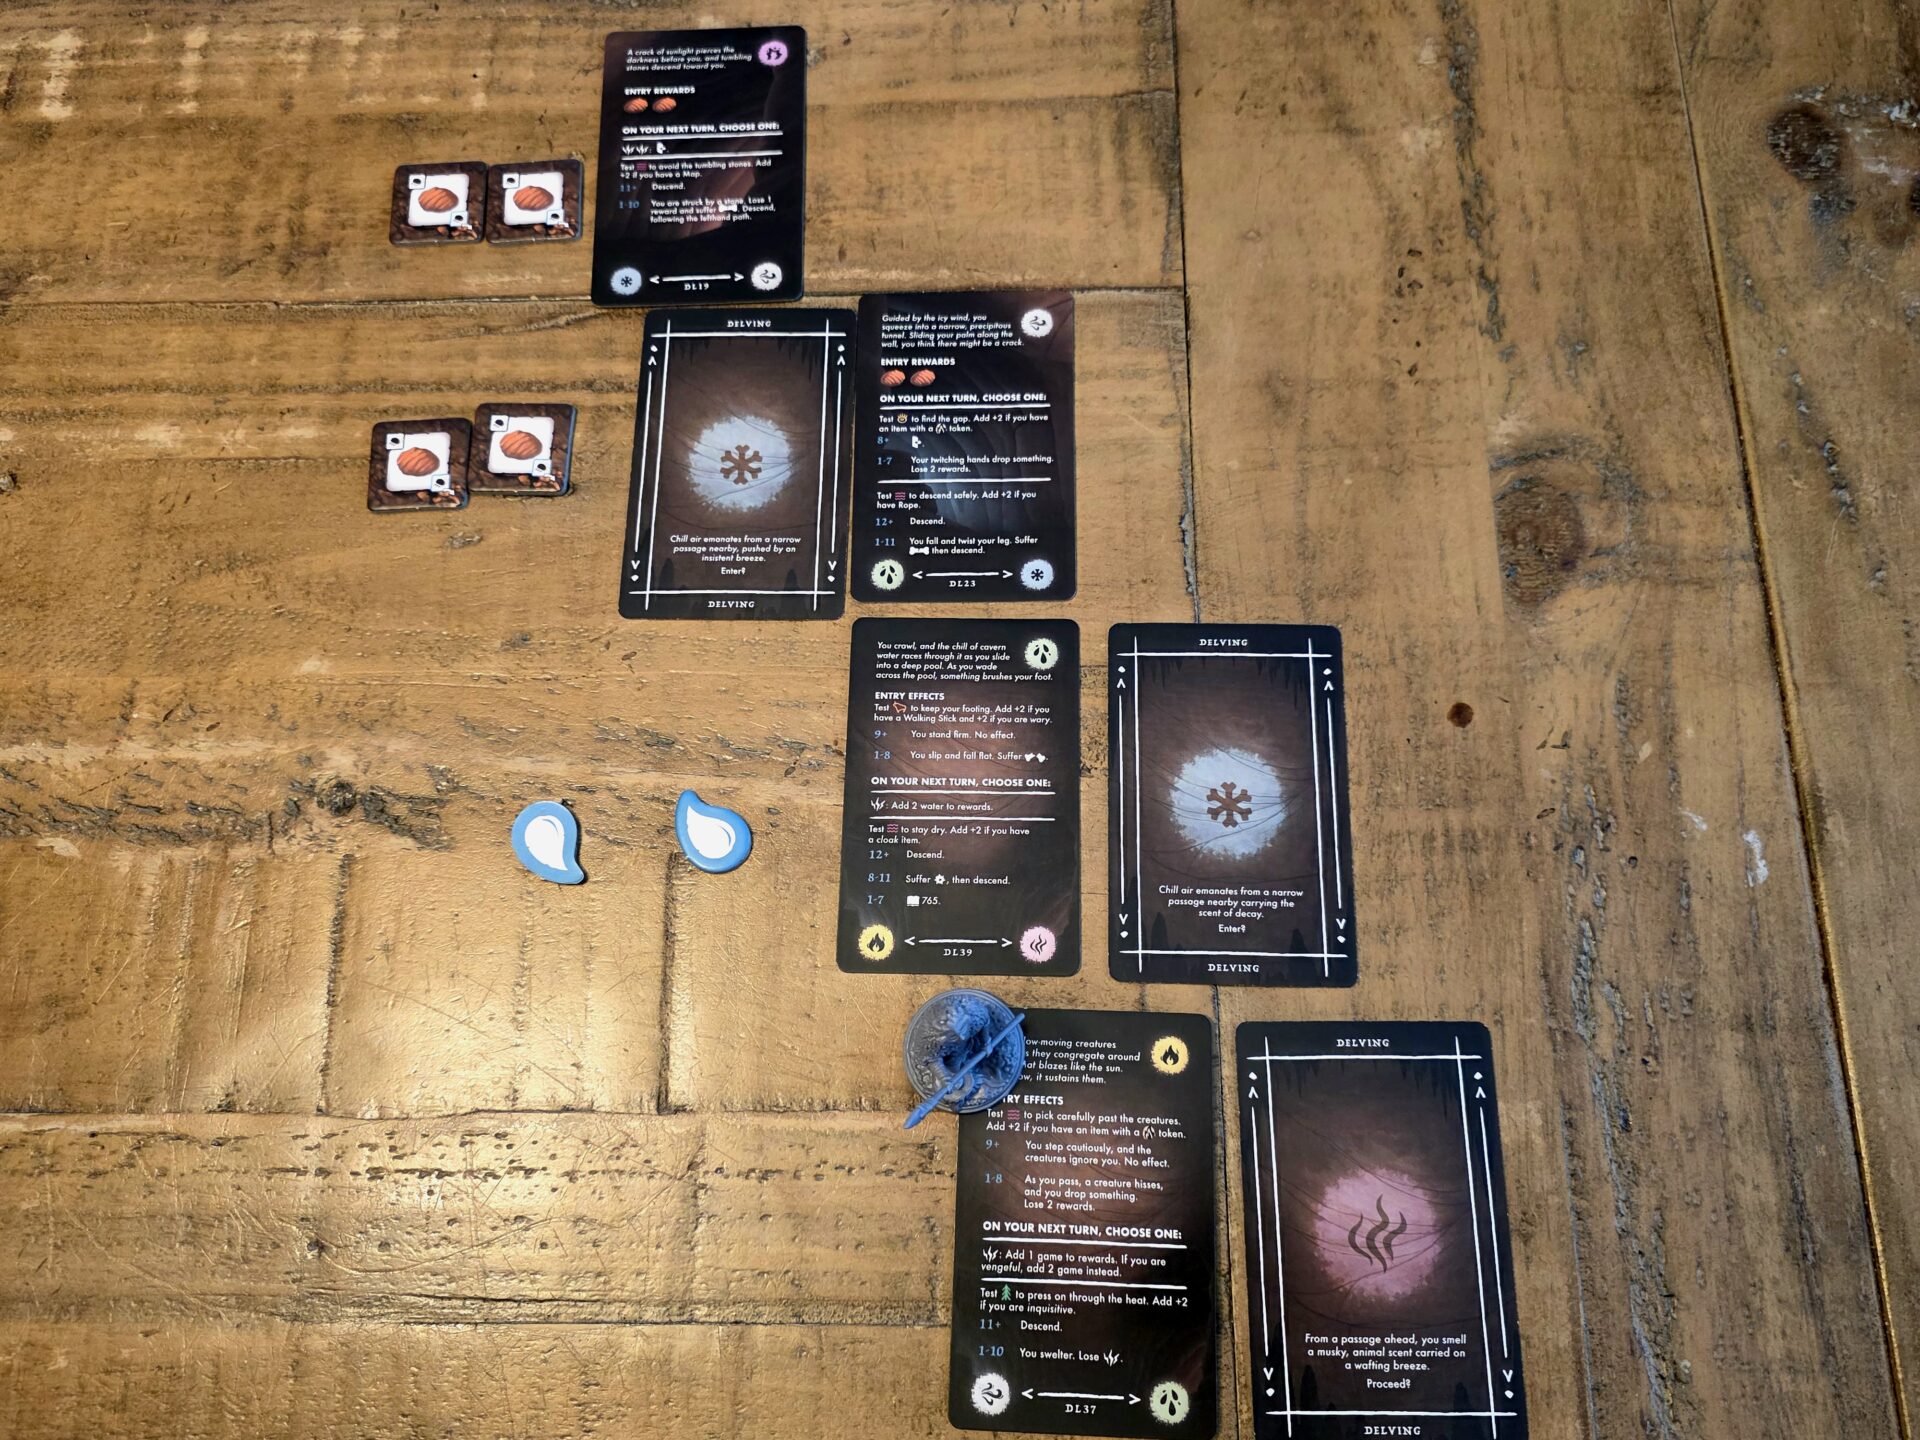
Move – players may move their Character Miniature from a hex to an adjacent, whether the hex is Explored or Unexplored. Most of The Valley starts as Unexplored Regions and when a miniature moves into a hex, the player will flip the tile to the Explored side. The Explored sides will have a multitude of different Terrain Features printed on them, slotted across three zones on the hex. As I said earlier, Moving form one hex to another doesn’t inherently cost Energy, but it also isn’t free. The player must draw the top card from the Journey Deck and resolve it. The Journey Deck is similar to the aforementioned Night Deck, except many of the outcomes can be more on the positive side for the players.
Exchange – spending a single Energy allows players, who congregate in the same hex, to Exchange both Resources and Items. I like that the game allows you to Exchange any number of these things in a single Exchange action so that it doesn’t “nickel and dime” your Energy to death.
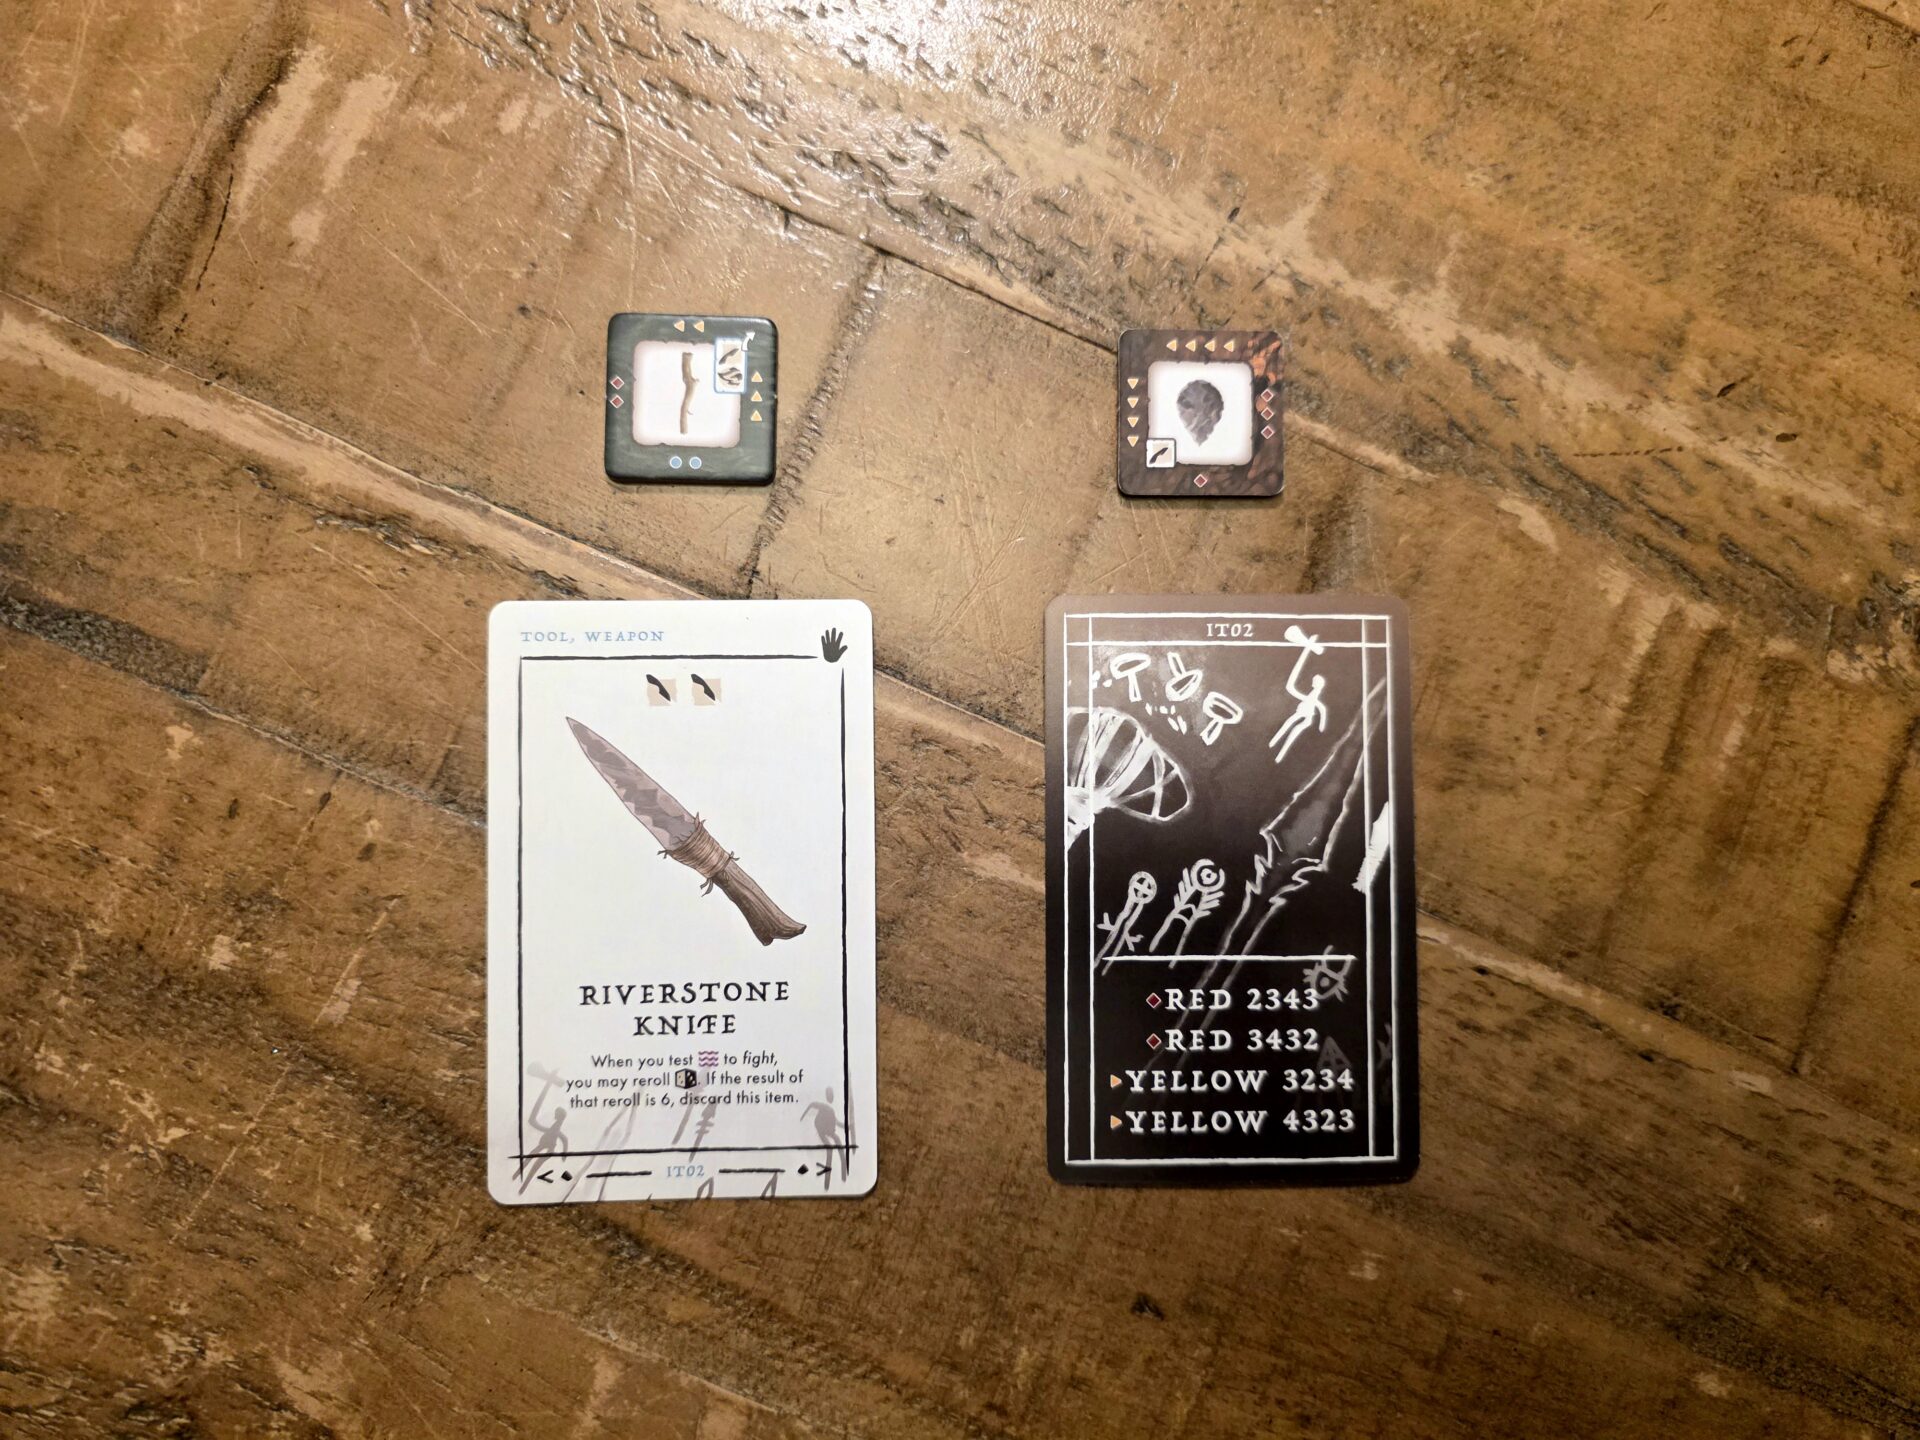
Process / Crafting – no “sandbox” game would be complete without some type of crafting mechanism and Stonesaga has this in spades. All of the Materials that players come across will be of the Processed or Unprocessed variety. Some of the Materials (such as wood) can be used in either state, creating different results, while other Materials can only be used after they are Processed. Each Material is marked in their bottom right corner with what Tool is needed to Process them. Players can spend one Energy and Process up to three different Materials. The only real barrier is that a single Tool (except Fire) can’t be used multiple times in the same Process action, but this can be overcome by finding, or creating, better Tools in the future.
Players will know if a Material is able to be used in Crafting by the appearance of different symbols running down the edges of the token. A player need only to spend a single Energy and then line up two Materials with identical symbols on both of the inner edges. They’ll then use the left-most icon color as the letter prefix for the Recipe, along with the values of each column of symbols reading left to right. For example, in the picture below a player is Crafting an Unprocessed Wood and a Processed Riverstone. This Recipe Code would equate to R2343. The player then looks this up in the Codex to find the results of Crafting these items. If the result is an Item, the Codex will instruct the player to discard the Materials and draw the appropriate Item Card from the Item Deck. Lastly, players can record these Recipes in the Journal for future reference. There are close to 100 Item Cards and when I completed my first campaign, I’d say I had crafted around 1/3rd of the total items, so there will be plenty to discover on future campaigns.
For the most part, the Crafting system has been a lot of fun. I will recommend that players use the piece of the Journal to record the Recipes that did not result in anything, as I spent a lot of wasted time trying failed combinations again and again because I was too lazy to write them down. A few times I just couldn’t figure out how to craft something I really needed, such as a Digging Tool even though I was sure I had tried every combination. Likewise, I still don’t know how to make a Cloak Item, though it is mentioned on numerous occasions. Maybe that was another misprint? I’d love to know if anyone can comment if they were ever successful finding this!
Building Outposts & Structures – Eventually, players will learn how to build an Outpost in The Valley. These function as bases for the Characters and are represented on the map as a Tile Overlay. Each Outpost can contain five different Structures. Throughout the game, players can spend Lore to “discover” the Structure Cards, enabling them to build these at the various Outposts. Each Structure has a cost associated with it and occasionally requires certain Tools to have been discovered by the Civilization. I don’t want to spoil too many of the Structures but some of the first you learn include Storage Containers, an extra inventory cache that can hold four resources, or the Drying Racks, a similar Structure that can hold four Meat Tokens that won’t degrade over time. As your Population (one of the four Society Tracks) increases, the maximum number of Outposts allowed increases as well so players can soon have multiple ones built all throughout The Valley.

Along with the Basic Actions, the player will learn about Feature Actions during the tutorial. These actions are dependent on the Terrain Features found on the hex tiles that the Characters occupy.
Feature Actions
Gather Water / Prepare Shelter – these are the simplest of the Feature Actions. As long as a Character is on a hex with a River, Lake, or Wetland they can spend one Energy and gain two Water Tokens. These are important during the Night Phase as they allow a Character to regenerate one Energy and will keep dreaded Maladies away. Another way to regenerate Energy is to spend the Night Phase in a hex with a Shelter Token. To prepare a Shelter, the Character must be on a hex with a Cave, and they can spend one Energy to create a one-person Shelter. This can be upgraded to a two-person Shelter by performing the action a second time in the same hex.
Fish / Forage / Mine – all three of these actions act in a “push your luck” fashion, giving out big rewards but also dealing out big risks at the flip of a card. All of these actions cost two Energy to perform and as soon as they are, the hex that the action is performed in gets a Depletion Token. This token acts as a marker to remind the players that if they perform one of these actions again in the same hex, it will cost even more Energy. Likewise, this token will get flipped to add even more Energy if an action is performed a second time. In this way, players can’t just hang out on a single hex and continue to pay the same amount of Energy over and over again. The tokens will degrade each Night Phase and will eventually get taken off the board.
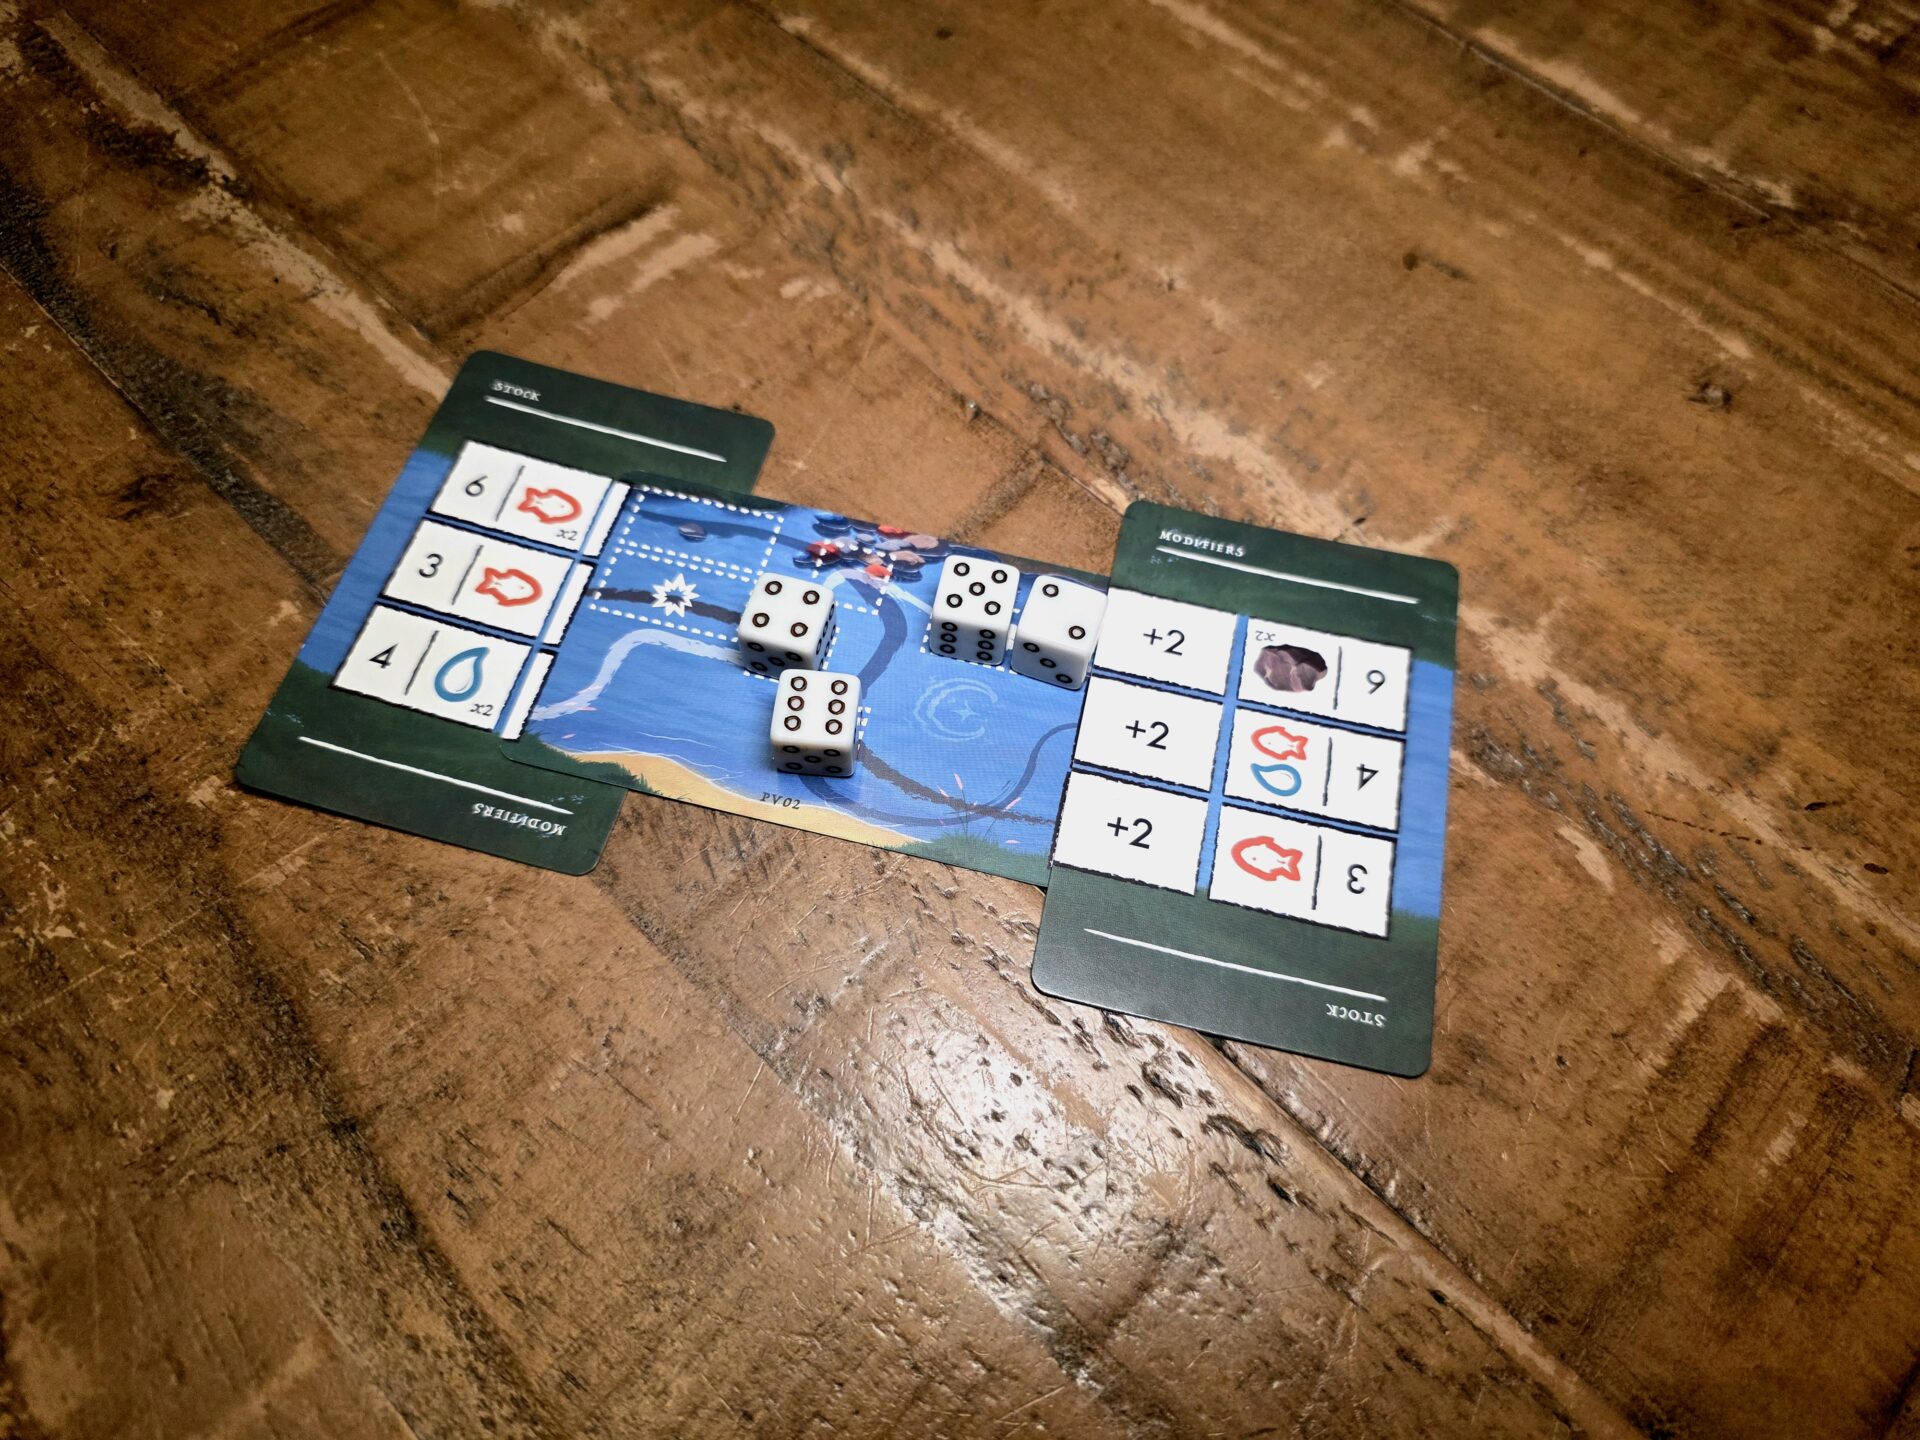
If a Character is on a water feature, they are able to Fish. Fishing involves shuffling the Fishing Deck, drawing a series of cards to put onto the table. The first card is called the Stock and gives the player three available rewards, each with a numerical value. The second card is turned horizontally and flipped on the other side, displaying the Strike Zones and Currents. Each of the prizes from the Stock Card will line up with one of the three Currents. The player will then roll four dice and decide what Strike Zones to place them in. Some Strike Zones can hold a single die while others can hold two. The point is to place dice in the Strike Zones that will sum up to greater than or equal to the numerical value listed on the reward. Easy enough right? Not so fast. Once the dice are placed, a third card is flipped and put on the far side, listing three Modifiers for each of the three Currents. Players will need to resolve each Strike Zone, tallying the sum of the dice against the (now) modified numerical value on the Stock Card. If the value is greater than or equal, the player wins the printed rewards. This is a great way to gain Fish Tokens (for eating), Water Tokens, and even resources such as Wood.
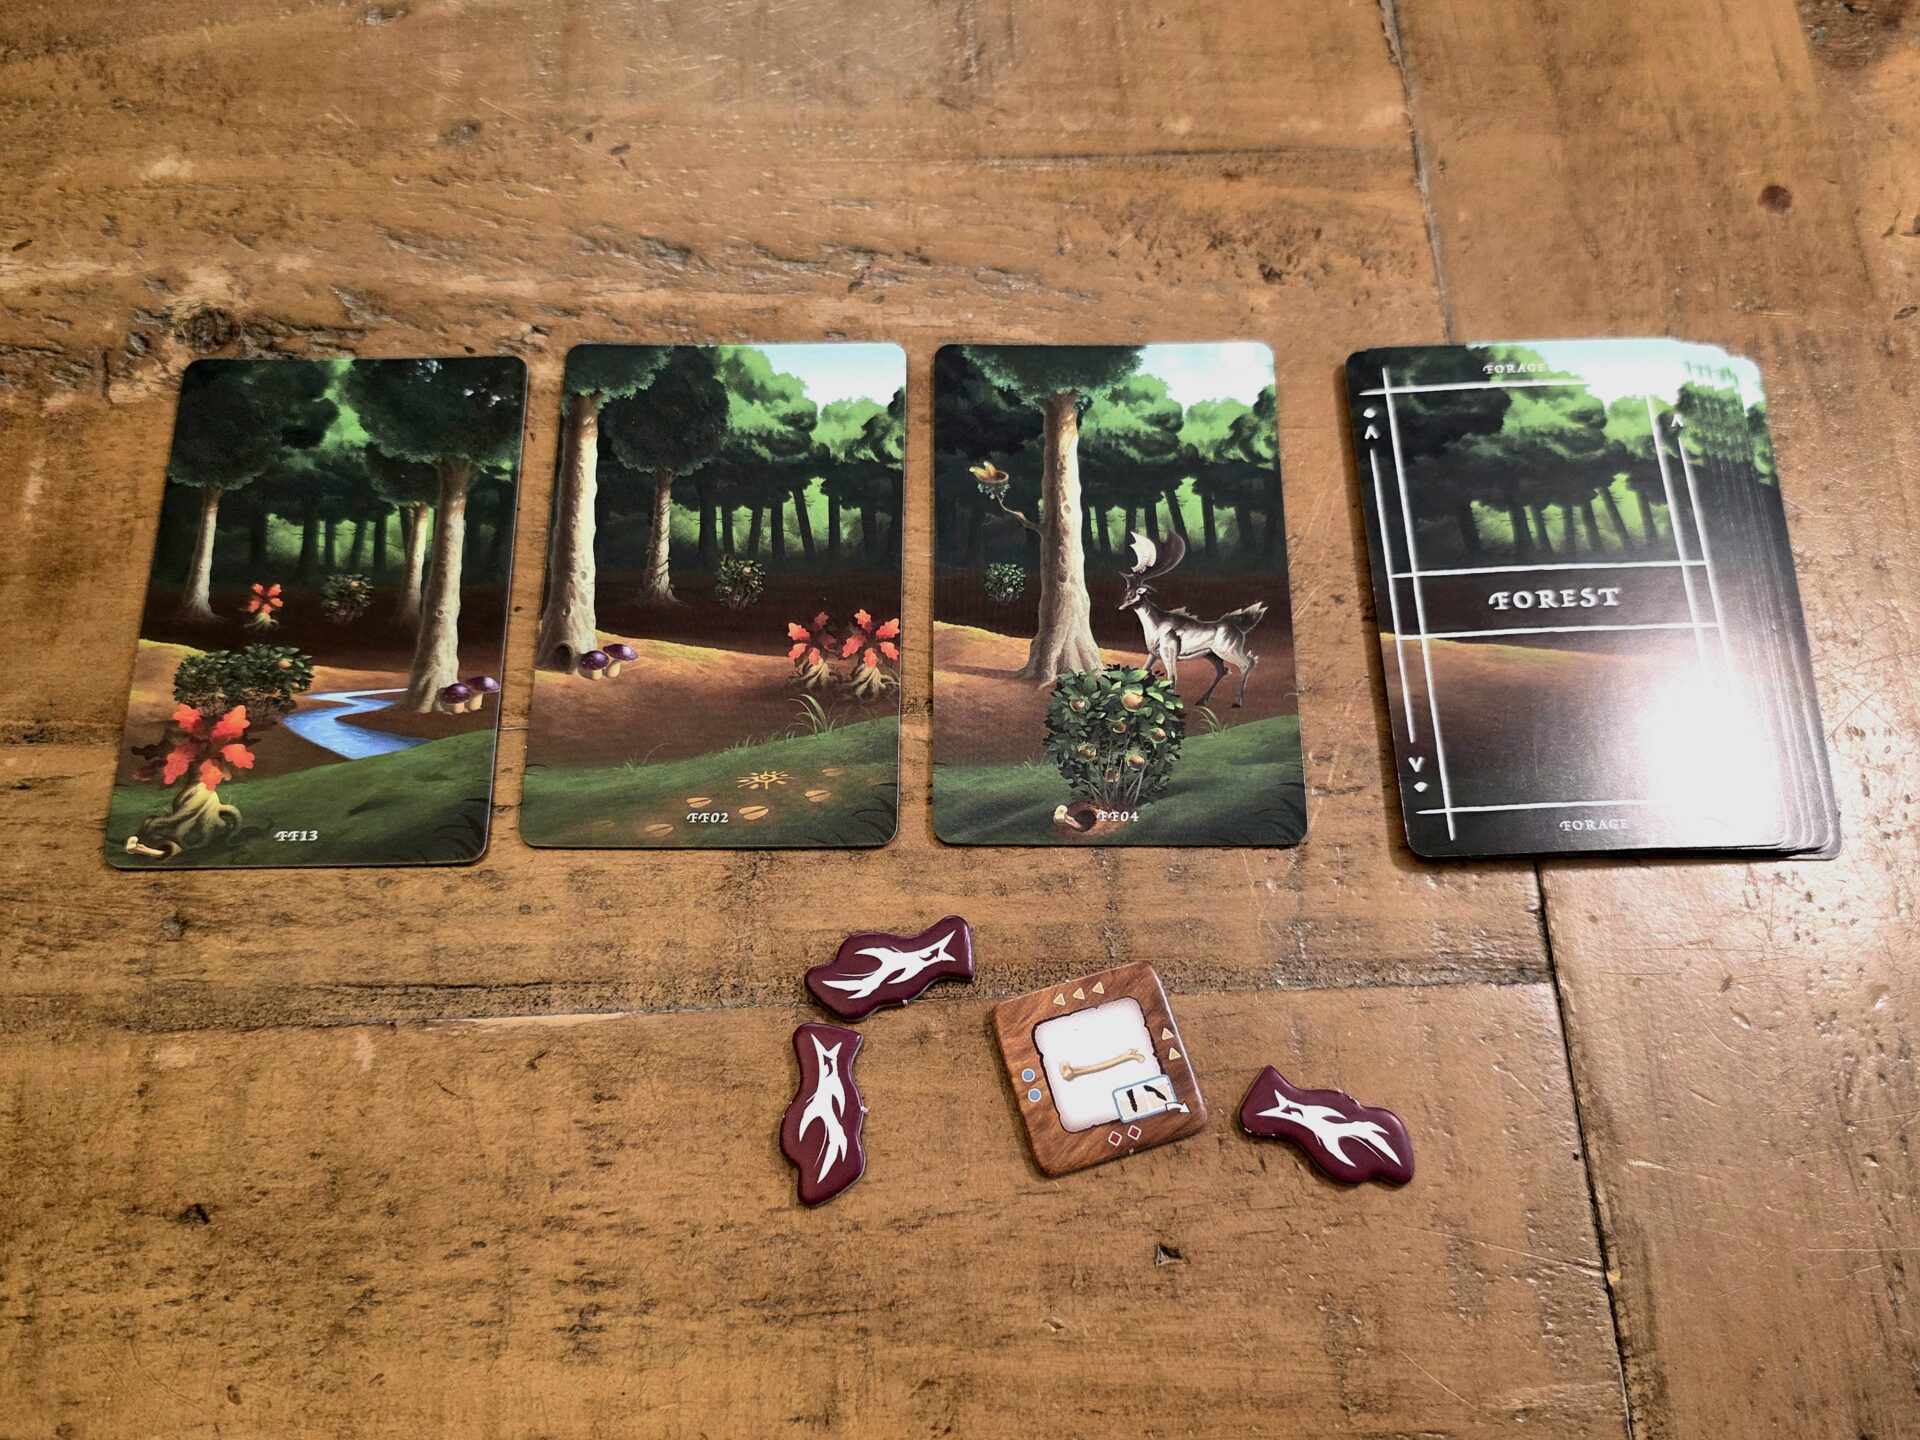
The Foraging mini game is similar to Fishing but without the use of dice. If a Character is in a hex with either a Forest or a Prairie, they can choose to spend two Energy to Forage. The player will grab the necessary Foraging Deck and shuffle up the cards. They then will draw two cards, laying them side by side, choosing one to start their tableau with. These cards are split into three zones: the Foreground, the Midground, and the Background. A plethora of different objects will adorn each card, including trees, animal tracks, small or large prey, vegetable foods, and even Predators. Once a card is picked, the other is shuffled back into the deck and another two are drawn. Again, the player will choose one to add to their tableau. This can continue indefinitely until the player decides to finally Harvest, Hunt, or is attacked by the Predator.
When a player decides to Harvest, they can take up to three of the same resource spread throughout their tableau, but all three have to be in Reach of the player. This means that if a player takes a Root Plant from the Foreground, they can then take one from the Midground. Similarly, if they take one from the Midground, they are then allowed to take one from the Background. Hunting is done similarly though players can also use Animal Tracks to help them Reach prey in the Midground or Background.
The risk here is the dreaded Predator emblazoned on some of the cards. This beast can show up in any of the three sections across the cards. If a player chooses a card with a Predator on it, this will impact their available choices moving forward. Once a Predator is in the tableau, any future cards that include a Predator in a closer zone must be chosen. This dramatically increases the chances of a player drawing a card where the Predator is in the Foreground, and they are then forced to either Fight, or Flee, from the shell-wielding monster.

Lastly, you have the Mine action which takes place across a variety of features including Chasms, Mountains, and Caves. Each feature includes a different group of Mineral Materials including Clay, Riverstone, Sunstone, and Cloudstone. When taking the Mine action, players place the required Mineral Tokens into the bag and shuffle them up. They then draw one token out of the bag at a time, up to three times. The Mineral Tokens are actually shaped slightly differently so players can usually find the stones they need by paying attention to the shapes. Once a token is pulled out, the player gets that mineral but also must look at the other side for the Omen printed there.
There are five different Omens found throughout the game. A Current Omen is the Omen (or Omens) listed on the last drawn Night Card, or on the current Challenge Card if no Night Cards have been drawn yet. If the Omen on the Mineral Token matches that of the Current Omen, players must look up the entry in the Codex and resolve the effects. These are typically negative so players must decide if they want to continue mining for the other two tokens or quit while they’re ahead.
What I’ve covered so far are most of the basics of the game. Next, I do want to talk about a part of the game that players won’t immediately learn about so if you don’t want to be spoiled, you can skip down to the section called Campaign Thoughts, where I will discuss my overall thoughts after playing a full campaign but without giving away any juicy plot points.
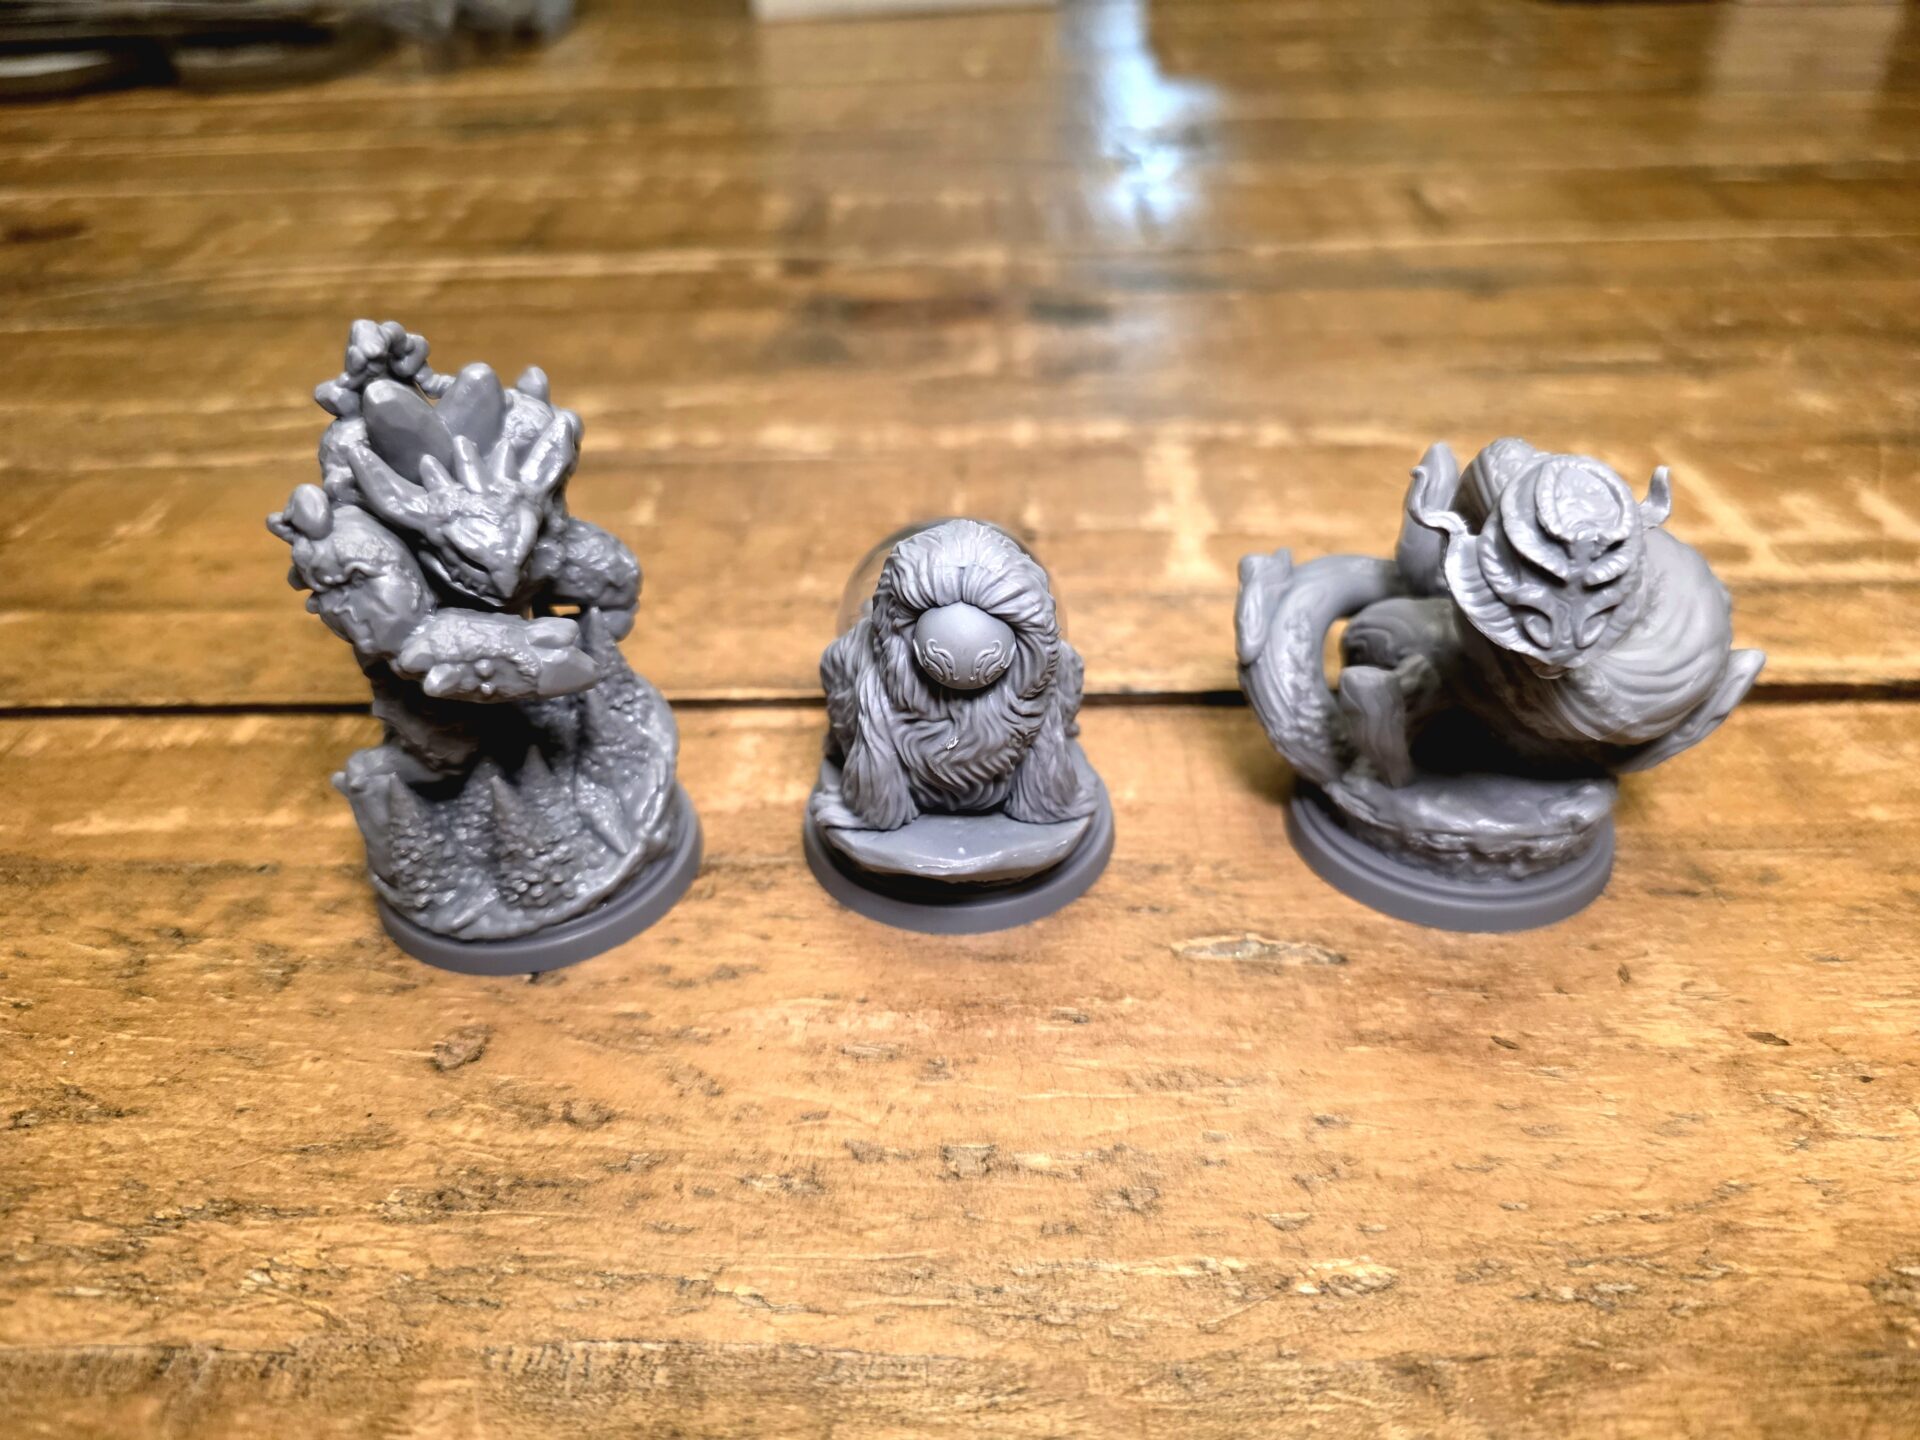
Behemoths
I would bet that when new players are unpacking the Stonesaga box, the three Behemoth miniatures are going to be a focal point for their attention. These beasts stand two to three times taller than the Character miniatures and give off a fairly ominous vibe. But how exactly do the Behemoths work into the Stonesaga game?
The third game in my campaign required me to use the Challenge Card The Arrival. This Challenge instructed me to the necessary areas of the rulebook where I found out how to introduce a Behemoth to The Valley. The Behemoth has its own Lair Tile Overlay as well as both Instinct and Secret Cards assigned to it. The Instinct Card acts as directions for how the Behemoth is going to interact with the Characters and map during the current game. The Secret Cards can be revealed by the player throughout the campaign, giving added information to them on how best to influence the Behemoth itself.
Once a Behemoth is introduced, there is a new Behemoth Phase that takes place after each Night Phase. For the most part, the Behemoth takes Aim at a certain feature in The Valley. This feature is marked with an Aim Token and then the player tests the Behemoth’s Attribute listed on the Instinct Card. Resolving the effect typically means the Behemoth will Tread toward its Aim by one or two hexes, while also possibly gaining Boosts to its tested Attribute. If the Behemoth reaches its intended Aim, the token is flipped to show the Trace side, and then the Behemoth will Aim at a new feature on its next phase. Typically, once the Behemoth has revealed three Traces, the player is instructed to read a specific entry in the Codex and resolve any effects listed there.
The interaction between a Character and a Behemoth happens when a Character starts the Day Phase in the same hex location as a Behemoth as this triggers an Encounter. Each Behemoth has its own Behemoth Board that has a lot of information about the beast but also has a sort of map on the right side, called the Encounter Chart. When a Character has an Encounter, its miniature is physically moved to one of the three starting points on the Encounter Chart. The necessary starting point depends on the Behemoth’s current Demeanor Level, which is a value that can increase or decrease depending on the past interactions with the Behemoth.
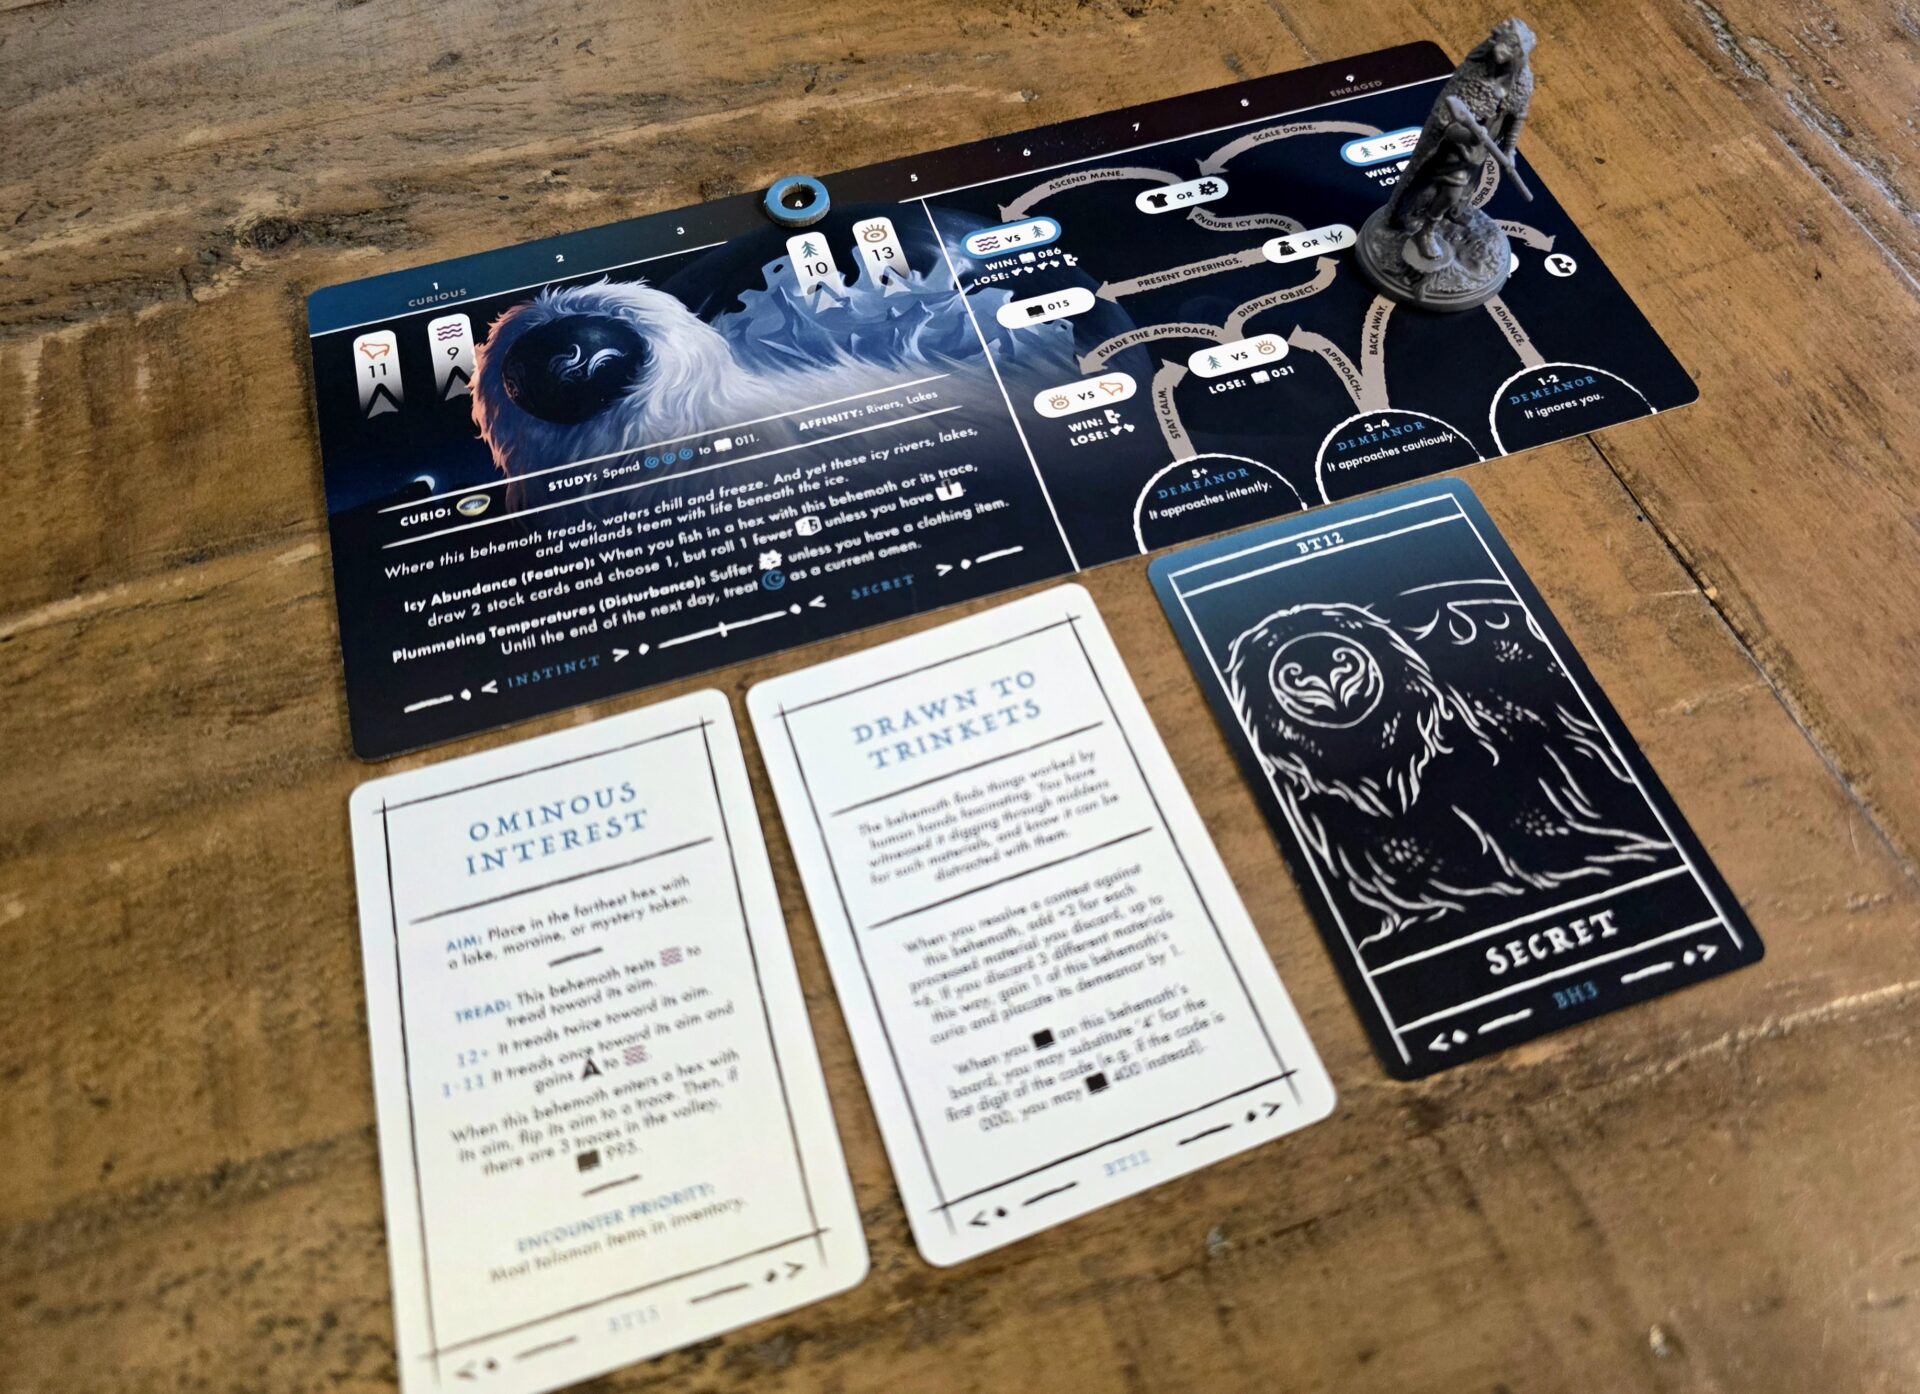
The Character will move upward on the Encounter Chart, stopping at Nodes that require the Character to pay Energy/Resources, have certain types of Items in their inventory, or test Attributes, to pass the Node and continue upwards on the Encounter. Some Nodes even let the player exit the Encounter. Many times, there are branching paths from the Nodes that the player can choose between, but they can never go backwards once they’ve chosen. Some of the branches will finalize in Apex Nodes, challenges that test the Character Attribute against the Behemoth’s own Attribute. If successful, an entry is typically read in the Codex that allows the player to somehow influence the Behemoth physically in some manner.
My thoughts on the overall Behemoth piece of Stonesaga are very mixed. First, I think the rules could use a lot of clarification in this area. There can be a lot of confusion between a Lair being Active or Inactive and what this means for a Behemoth being Alert or Dormant. I think it would be very beneficial to players if the game included a “one-sheet” (much like they did with Fish/Forage/Mine) to streamline the Behemoth rules. Instead, players have to flip continuously to the multitude of pages in the rulebook that try to explain everything. I also didn’t feel that the rules were super clear on how exactly to choose the Instinct Cards. For the Behemoth that arrived in my Valley, there were two Instinct Cards with its designation but in the box, there are also Instinct Cards to be used for “any” Behemoth. Some Challenges specifically told me which to use, but when the Challenge didn’t, I felt that I basically had to randomly pick from the two designated to my Behemoth. This felt pretty stale as it had the same Aims over and over again.
On the plus side though, I really did like having to Encounter the Behemoth and using Lore to discover the Secrets was a cool way to learn more about the Behemoth. During my campaign, I don’t think I interacted with the Behemoth as much as I could, as I only really did Encounters with it when the Goal or Challenge called for it. Later on in the campaign, many entries in the Codex asked if I had certain Marks on my Primal Cave Wall associated with Behemoth interaction and I always seemed to be missing these. I also know that somehow multiple Behemoths can be roaming around The Valley at the same time, but this never took place in my campaign. I look forward to learning more about the Behemoth play in future campaigns though!
Campaign Thoughts
It was important for this review that I completed a full campaign of Stonesaga before putting my thoughts down. With that being said, I probably played through it much faster than a normal group would as my dining room table was basically only used for Stonesaga for two weeks.
I actually played the first Epoch and transitioned into a second Epoch before starting over as I felt that I had misunderstood a few things. Between that first Epoch and the full campaign, it looks like I played a total of around 20 Challenges. Even so, I could see myself playing through multiple campaigns as there were multiple Regions I never even discovered, numerous Structures I didn’t even look at, Mantle Powers (that I didn’t even discuss here!) left to uncover, and multiple storylines that I didn’t even touch on. The downside to this is some of the Challenges/Goals are just too repetitive, especially in Epoch Two. I don’t know how many times I was asked to pull out the GA19 Goal and collect X number of Food/Water Tokens. I can’t say that I’m super excited about doing that again multiple times in a campaign, but maybe it’ll be different if I make different choices during the Challenges?
Besides these few repetitive pieces, I like the progression of the campaign. Throughout, you will be rewarded with different Marks for completing (or not completing) certain tasks. These Marks are then illustrated on the Primal Cave Wall (a sheet of paper that looks like… a cave wall) and referenced in future plays. I like how this is a true illustration of how your past decisions impact the campaign’s twists and turns, and it makes for a pretty neat visual at the end of the campaign.

Conclusion
Stonesaga was a treat of a game that wasn’t even on my radar. Yes, the rulebook is a sore spot (so make sure to get the app and take a look at the Errata file while playing) and there was some slight repetitiveness within the campaign, but mostly, I was engrossed with the world Stonesaga created for me and my Characters. I truly look forward to letting some time go by, and then start up another campaign, playing through it slower and investigating as much of the world as possible!
Rating
Ratings are based on 5 main criteria: rulebook, setup, components, art & graphic design, and gameplay. The first 4 criteria are rated 1 to 5 and the gameplay is rated 1 to 10. These scores culminate in an “overall satisfaction” score that is rated from 1 to 10. If the reviewed game has both a solo and multiplayer mode, I have assigned scores separately to give context to which mode we enjoy more.
Rulebook – 2 (as printed in the first edition)
Setup – 4
Components – 5
Art/Graphic Design – 4
Gameplay (Solo) – 8
Overall Satisfaction (Solo)
Pros:
- Engrossing campaign, full of discoveries to be made.
- Included Society Trays makes for an easier setup and tear-down than expected.
- Crafting, Outposts and Structures, and Feature Actions stand out.
Cons:
- Inconsistent documentation (rulebook, Codex, cards) on multiple fronts
- Some Challenges/Goals are repetitive.
Links
Kickstarter: Stonesaga on Kickstarter